This is a simple tutorial showing how to go about basic keying in After Effects (non production bundle) There are so many variables to take into consideration when keying greenscreens that they would be impossible to cover in one tutorial. So I have picked only one shot, and will walk you through producing it. Hopefully you will understand the underlying principle and then be able to use this knowledge to help improve/begin your own bluescreen keying.

Step 1. First you need to set up your composition settings (pictured above) and pull in your footage. In this case the footage is the Shuttle Background (which you will see later) and the Luke/Greenscreen footage. The Luke footage needs to be placed above the background. Hopefully you know how to do this part, if not, we could be in trouble later on.
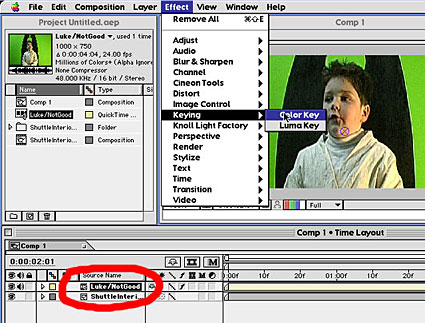
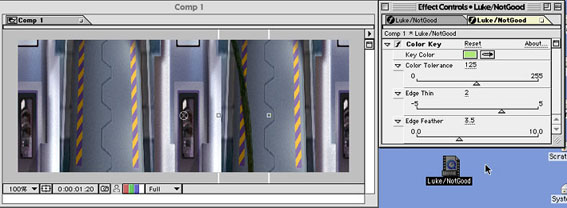
Step 2: Making sure the greenscreen layer is selected in your timeline (circled) go to EFFECT> KEYING > COLOR KEY. A new window will pop up showing you the Color Key attributes.
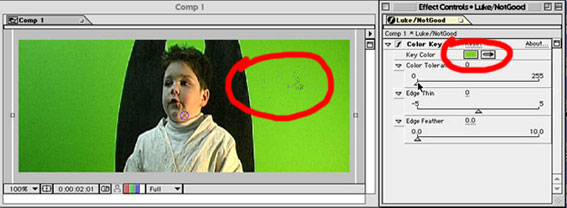
Step 3: Click on the color picker (circled) and move your cursor over to your image, then click on an area that is a fairly even level of green (or blue) Immediately you should see some of the green disappear. This example isn't amazingly flat, which is ideal for this tutorial.
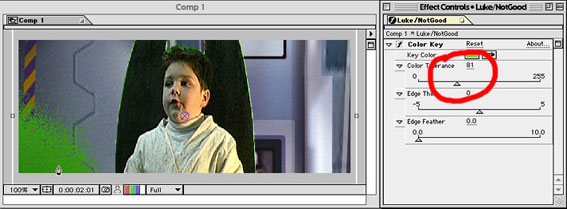
Step 4: Now using the color tolerance slider, move the bar to the right and watch as more of the green disappears from your image.

Remember: Don't get too 'greedy' and try to key out too much is one pass. The picture above has removed most of the green, but also half of the actors face, it's better to use multiple passes.
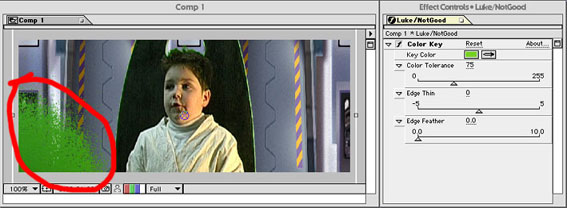
Step 5: Setting the Color Tolerance back to 75 we obviously have an area that we can't 'get' in one pass, so we'll need to make another color key pass to remove this area of unevenly lit greenscreen.
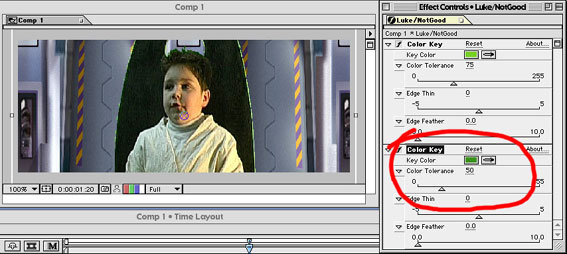
Step 6: Repeat the process we used in step 2 (EFFECT> KEYING > COLOR KEY). Now you will have a second Color Key dialogue box in your effects control palette. Again using the color picker highlight the mid range colour that needs to be removed (circled in red in step 5) Again using the Color Tolerance, move the slider until all of this green disappears. In this clip it was completely removed at 50. So that's your greenscreen keying finished then!
Or is it? What's that nasty green jagged line around the edge of Luke's chair then?
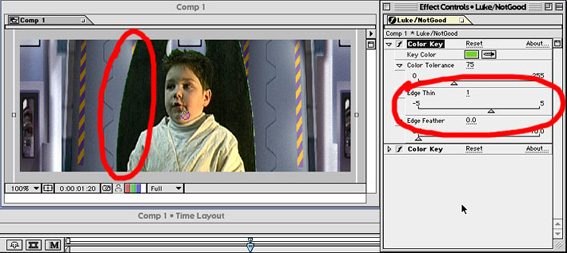
Step 7: To remove this we need to use the other tools in our Color Key pallette. First slide the 'Edge thin' to plus one. This makes the green on the left hand side begin to disappear...
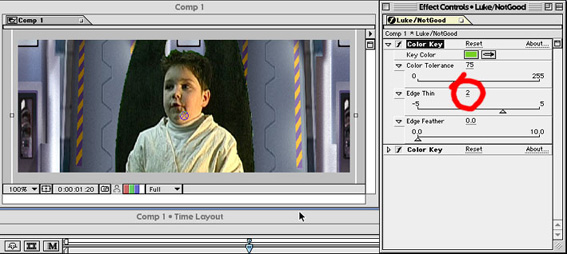
Step 8: By moving 'Edge thin' to 2 it's really starting to vanish. But it looks about as smooth as a mountain range. We need to edge feather...
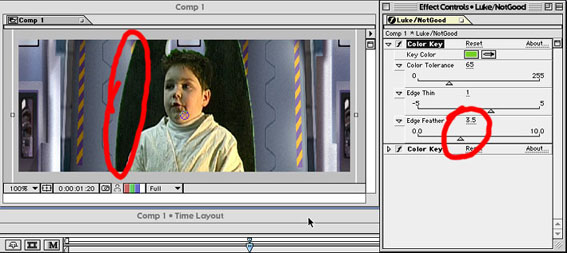
Step 9: With an edge feather set to 3.5 the line is much softer. Experiment with these settings, and see what effect you prefer. A combination of edge thin and edge feather can produce a host of different looks to help you remove that unwanted edge. Shame we can't say the same for the right hand side. This needs special attention...

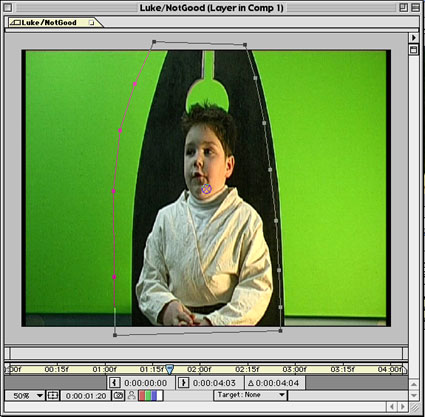
Step 10: Make a duplicate of the footage layer in the timeline window. Click on the 'eye' icon on the middle layer to turn it off. Now double click on the top footage layer in your timeline, and a new window will pop up looking like the one above. It's the raw footage without any effects applied. Using the pen tool (circled) click around the area we want to mess with, making sure the points join at the end, we are creating a mask of this area, which can be treated as a problem of it's own. Once you have finished clicking, close this window and look at your main project window, notice that we now only have the area that we masked left, closer inspection shows the nasty green edge still remains...
Step 11: Now that we have isolated that section we can really wind up the tolerance to remove the green. Here we have moved to 125 and the green has finally disappeared. Isolating these areas let's you become more 'aggresive' with your color tolerance, without affecting the entire image (as in Step 4)
So now we have removed the rough stuff on the right hand side of the chair, however it still remains on the main layer. As soon as we turn that layer back on it will show up, so we need to remove it. Double click on the middle layer and repeat the procedure in Step 10 for creating a mask, the difference here being that you are creating a mask for the rest of the image. Make sure you have some overlap between the two layers, so there an no 'gaps'
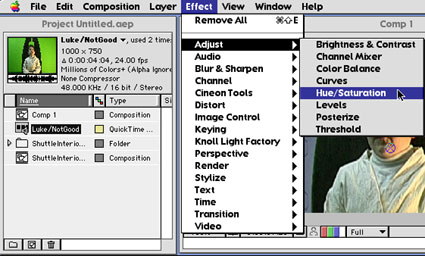
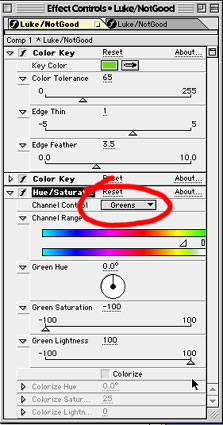
Step 13: We're in the home straight now. We have our three layers (two keyed & one background) and we are pretty well finished, but there is still a vague green glow around the edge of your subject, caused by light spilling onto your subject from your greenscreen. Let's get rid of that. Click on the greenscreen layer and go to EFFECT > ADJUST > SATURATION. In the 'effect control' palette, pull down the menu next to channel control to make 'greens' active (if you where using a bluescreen you would of course highlight 'blues)' Now just reduce the Saturation on this channel until the green spill has vanished, also mess around with the 'Green Lightness' slider and see what gives you the best results.
Creating a custom (blue)screen tutorial is an impossible task. No two keying operations are the same. Above are some broadbrush principles you can use to help you create better keys for yourself using Adobe After Effects 4. Try out these techniques, expirement with the settings and see what works for you. Hopefully this tutorial will be the first step in creating better bluescreen keys in your project. Good luck!
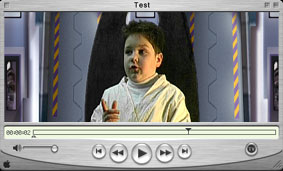
Result: Click on the above picture to download the composited shot. It is 500k and compressed using the on2 codec. You will need Quicktime 5.02 or above to view. Download the latest version of Quicktime fromhere
Related Links: PostProduction Tutorials

![[TFN FanFilms Now On YouTube.com]](/fanfilms/images/fanfilm-youtube.jpg)