Multiplayer Walkthrough
This tutorial will show you how to join or host a multiplayer game.
It may be beneficial to print this out, as you will not be able to read it when attempting it.
Joining a Game
Step One: Insert your CD and choose the Muiplayer Game option.
Step Two: Click the Play button in the upper left.
Step Three: Choose the Join Server option.
Step Four: By clicking the word following the option, set to the following:
Source: Internet - This sets where to look for games. Favorites is your favorite servers. If you haven't set favorites, none will show up. Local sets to your local LAN, which is only applicable if you are playing in a LAN party or someone on your network.
Map: All - This sets what map to look for. If you have a favorite map, you can try to filter by that map, but I won'ty guarentee that when you join the server it will have changed.
Data Rate: 56K - This sets what speed the server is connected at. If you are more picky, feel free to set it elsewhere.
Game: All - This sets the type of game in regards to the title.
Type: All - This sets what type of game to look for. If you are looking for a specific type of game, set it to that.
View Empty: No - Shows the empty games or not
View Full: No - Shows the full games or not
Step Five: Click the Get New Info button and wait for the list to update.
Step Six: I recomend sorting by
Ping by clicking that word until the lowest numbers are at the top, but you can sort by other things as well.
Step Seven: If you see a game that is has a square with a lightsaber in it, that means it's a saber only game. It the player column has same numbers (IE: 7/7) that means it's full.
Step Eight: When you've found a game you like, double click it to join in.
Step Nine: If you get in where you see this screen you're in. Otherwise, keep trying.
Screen:
 Step Ten:
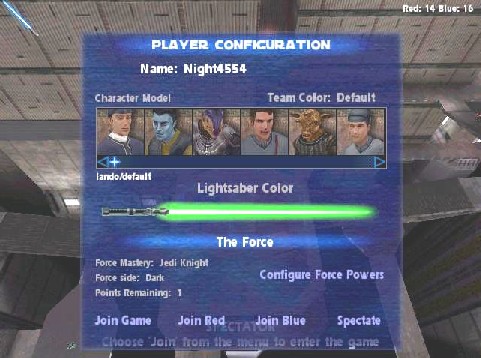
 Wait till you see this screen:
 Step Eleven:
 Click the Configure Force Powers. Pick your side, light or dark, and assign points to pick your powers. When you're done click the Join Red or Join Blue or Join button to start playing.
Hosting a Game
Step One: Insert your CD and choose the Muiplayer Game option.
Step Two: Click the Play button in the upper left.
Step Three: Choose the Create Server option.
Please note: if you are behind a firewall, or in a network, you may not be able to have your friends join the game.
Step Four: Configure the options you way you like.
Type: This sets the type of game.
Server Name: This is an important part, it sets the name of the server to be displayed.
Map: This is not an actual place to click, rather it dominates the left side of the screen. You select the map from the scroll list.
Maximum Players: This sets the maximum numbers of players allowed into the game. If you are running a phone line (56K) connection, set this low to avoid lag.
Time Limit: Sets the time limit of the game before the map advances. Once the time or kill limit is hit, the game advances to the next map.
Kill Limit: Sets the kill limit of the game before the map advances. Once the time or kill limit is hit, the game advances to the next map.
Lightsaber Only: Sets the game to be lightsaber only or not.
Force Mastery: Sets the level of force skill.
Disable Force: Lets you disable force completely.
Auto Join: Allows people to automatically join a game. Set this to "no" if you want the game more private.
Do Warmup: This makes a warmup before the game actually starts. The characters run around for a bit without actually counting for anything.
Warmup Time: Sets the warmup time, in seconds. If you have Warmup disabled, this does nothing.
Enable Voting: Allows the players to vote in the server.
Dedicated Server: Sets it to dedicated server or not. A dedicated server is one you, the host, does not participate in. Dedicated servers are faster, and the preferred way to play. However, because you, the host, do not play in it, you have to choose.
Require Password: Sets the game to require a password. Lets it be perfectly private.
Password: Sets the password. If password is disabled, this doesn't do anything.
Players: This is not a single box, but rather is the right hand side of the screen. you can asign bots and such here and set the skill level at the bottom.
Step Five: Press the
Begin button and wait for your friends.
You have to give your friends a way to find your game. There are three ways to do that:
1)Tell them your server name. A prearranged name for them to look for.
2)Find a Player. If you don't change your name, they can search for you with this tool.
3)By IP address. This is the most reliable method. By locating your IP address (your IP address will appear in the text field when you click Start Trace at this site: http://visualroute.visualware.com/) They can put it in the Favorites choice and pick from there.

