|
 |
![[Fan Films - Main]](/images/fanfilms/leftnav_local_off.gif) |
|
![[Fan Films - More]](/images/fanfilms/leftnav_more_off.gif) |
|
|
|
|
|
|
|
|
|
|
![[Poll]](/images/fanfilms/local_poll_top.gif) |
|
|
There are no polls
currently operating
in this sector.
Please check
back soon.
View Poll Archives |
|
|
|
 |
|
|
 |
|
|
|
TFN FanFilms | Post-production | Rotoscoping
| |
|
| |
Lightsaber Effect Rotoscoping in an Adobe Premiere Filmstrip,
New: Improved Technique
by Darel Finley
|
| |
|
| |
|
| |
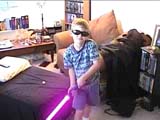
Click thumbnail to view QuickTime
movie.
Copyright June 2000, Darel Finley
The rotoscoping technique described in this page has been substantially improved since the
original "Henry and His New Toy" tutorial! The benefits of the new method are:
* Easier and faster -- ends of saber round automatically.
* Better look -- truer to the Lucasfilm effect.
* More detailed tutorial -- explicit step-by-step instructions.
(Copyright Notice: The word "lightsaber" is probably owned by Lucasfilm Ltd., and
"Star Wars" definitely is. This webpage is
for informational purposes only, and I recommend using the authentic lightsaber effect only
for non-commercial, experimental, amateur filmmaking.)
Ever since we saw the original Star Wars in 1977 (when it didn't say "Episode IV
A New Hope"), enthusiasts such as myself have been wanting to have the ability to
generate similar effects. Well it's been a long wait, but finally the equipment and the
technique are within our grasp!
1. Making the Sabers
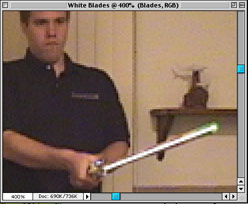
First, make one or more fake lightsabers. This consists of some kind of handle with a strong
rod coming off of it for the beam. For "Henry" I used the plastic tube from the
center of a roll of CalComp plotter paper. Then I wrapped blue and black electrical tape
around one end to simulate the handle. (I left the blue end-cap on the taped end, to give
it a little extra length.) The result kind of looks like a lightsaber already since the tube
is white, but this is irrelevant since no one's going to be seeing the rod anyway.
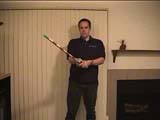
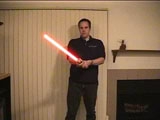
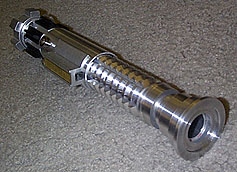
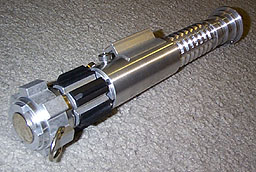
For a more authentic look, buy a saber prop from one of the various sites that sell them. I found the best bargains (and very high-quality sabers) at ParkSabers. A 0.75 inch dowel can be securely installed in these sabers, by backing out a few screws from the central tube, inserting the dowel, and driving the screws back in through the dowel. The screws aren't wood screws, but they drive easily into a wooden dowel with just an allen wrench. Here are two views of the "Avenger" model from ParkSabers:
The rod should extend about 30 inches beyond the end of the handle, and should be somewhere between 0.5 and 0.75 inches in diameter. (The plastic tube Henry is waving around is a lot thicker than that -- 1.3 inches -- which creates problems because even with a white tube, there are times when it is darker than the local background, and it's hard to cover it all up. But with a 0.75 inch dowel rod this shouldn't be a problem.)
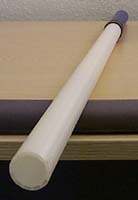
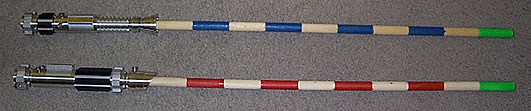
Next I painted alternating bands of paint up the dowel, making it look something like a marquee selector. Plus a different color at the tip. This is so when the beam is moving fast and blurring badly, you can still see clearly what area it traverses. It also helps to ensure that no matter what color the local background (black, white, or whatever), you'll be able to see the rod. (Naturally, these goofy-looking bands won't be visible anywhere in your finished film.) I didn't go to the effort to do this banding for the Henry clip, so maybe you won't need to either. Here's my attempt at this banding. To simplify, I painted 3-inch-wide stripes, and used the wood color for the alternation. So I only had to paint 5 bands on each rod:
Use different coloration on each saber to make them easily differentiable in closeup shots where the fighters have crossed beams and are glaring/sneering at each other. Otherwise it will be difficult to tell whose beam is whose.
2. Film the actors.
Don't try to frame everything neatly in the shot. If the saber goes out of view partially, so what? It happened in the Star Wars movies all the time. Trying to get everything neatly in the shot just draws attention to the fact that it isn't real.
(WARNING: Mock fighting with mock lightsabers can be dangerous. Try it at your own risk.)
3. Capture To Filmstrip File
3a. After capturing a raw saber clip into Premiere, place it into the timeline of your film project, then move the pale blue "work area" bar to include just the saber clip. Then select File > Export > Movie.
3b. Click the Settings button.
3c. Under "General Settings" select a File Type of "Filmstrip" and a Range of "Work Area".
3d. Under "Video Settings" select the appropriate frame size and frame rate for your movie. For my red-saber example movie, I chose 320x240, 15 fps.
3e. Click the OK button, name your filmstrip "Raw Filmstrip", then click the other OK button and your filmstrip will be created.
Tip: Filmstrip files are very huge, and unless you have a lot of memory, they will be an enormous headache to deal with in Photoshop. I recommend that you have at least 128 megabytes of real RAM, and process saber footage in filmstrips of only a few seconds at most. If you have a Mac running OS 9 or older, it is a good idea to turn virtual memory off (which will require a reboot), and allocate a lot of RAM to Photoshop (in the Get Info dialog).
(Optional: If your scene contains a lot of really bright areas, like bright sky, especially areas that might be pure white and would make a saber blade turn completely invisible, then before rotoscoping any saber beams onto the original filmstrip, darken it slightly by reducing the upper output level from 255 to 223.)
4. Rotoscoping
"Rotoscoping" is just a fancy term for doctoring something frame-by-frame. These instructions look complicated, but once you try it you'll find it's really pretty easy.
4a. After closing Premiere, open the file "Raw Filmstrip" in Photoshop. Then, select File > Save As, and save the file with a new name of "White Blades", and a file type of Photoshop (not Filmstrip).
4b. (You now should be in Photoshop, editing the file "White Blades".) Make sure the Layers window is available by choosing Windows > Layers, then double click the only layer there and name it "Rods".
4c. Select Layers > New Layer, and name your new layer "Blades".
4d. Before proceeding to the actual rotoscoping, make sure that the "Blades" layer is hilighted (active). Otherwise, you could do a lot of rotoscoping work only to realize later that you have to start all over!
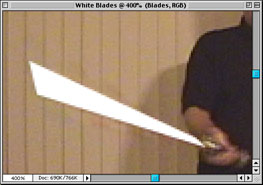
4e. Click once on the foreground color (the frontmost big colored square at the bottom of the toolbar), and choose pure white (255,255,255). This is the color you will be using to draw the blades.
4f. Select the magnifying glass tool, and click it a few times on your Blades window until the window's title bar says that it is being displayed at a magnification of 400%. Working at this magnification will greatly improve the accuracy of your rotoscoping work, and thus reduce the "quiver" problem which might otherwise result. Note: You might think that magnifcation doesn't matter, since the number of pixels in the image is still the same, but it actually matters a lot: Photoshop will use fractional pixel filling (anti-aliasing) to draw your line in the fractional position where you placed it.
4g. Double-click on the line tool (which may be hiding behind the pencil tool -- hold down the mouse button on the pencil to find it) and choose a line width about half or two-thirds as thick as your wooden dowel when it is still. I chose a thickness of 2 for this particular example project. Also, make sure that Anti-Aliased is checked. (Find it right next to the line width.)
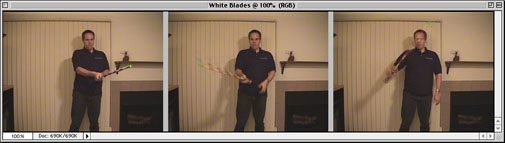
4h. (the actual rotoscoping) This is the only step you have to do for every frame in the filmstrip. (The aura stuff is done on all frames simultaneously.) Use the line tool to draw a line over the rod in every frame. (Save periodically to avoid losing your work in the event of an accident.) The line will not cover the rod, but this is OK -- just draw one line per frame.
(Note: In the above picture, it looks like there is a white bulge at the end of the white line, but this is just an artifact of the background image.)
If the beam is fanned (moving), then use the polygonal lasso tool (not the curvy lasso) to draw a polygon around the area covered by the fanning rod, then choose Edit > Fill to fill your polygon with white. Be careful to avoid premature closing of the polygon which can happen when a point is too close to the starting point. This will cause very noticable glitches on playback! Do not try to make the blade blur or fade when moving -- that's just too much trouble and it won't look authentic if you do.
Tip: Turn the caps-lock on when using the polygonal lasso, and the mousecursor will appear as a precise crosshair.
If only part of the blade is visible (such as when it's partially behind a person), then only paint white over the part that is visible (use the paintbrush when necessary). However, if the blade is behind the blade of another saber, draw over it anyway, even though the beam you're painting now is behind the other one.
IMPORTANT: If there is more than one blade in the shot, do only one blade right now, then go back later (after step 6 is completed) and do the other one. Do not do both at once! This is necessary to ensure that the beams can be different colors, but even if they are the same color you should still do just one to ensure that the auras are properly shaped.
Tip: Do not bother trying to give the end of the beam a rounded appearance. That will happen automatically in step 5.
Thanks to the layering of Photoshop, if you botch a frame up, you can just erase the white paint with the eraser and the "Rods" layer shows through.

4i. When you have finished rotoscoping all the frames, select the Background layer by clicking once on it, then choose Image > Adjust > Levels.
4j. Change the upper output level to 0. The Background layer will become completely black and the image will appear to be a bunch of boring white blades on a black background.
4k. Select Layers > Flatten Image, then select File > Save.
4l. Next, select File > Save As, and save the file as "Blades With Auras" (still in Photoshop format).
Continue to next page.
|
|
|
|

![[TFN FanFilms Now On YouTube.com]](/fanfilms/images/fanfilm-youtube.jpg)