By J. Daniel Sawyer
The problem is a simple one: Almost every science fiction film has energy weapons of some sort. Fantasy films and flashy commercials routinely include dancing fireflies or moving searchlights. And, for the truly devout Star Wars fan, nothing beats wielding a lightsaber. All of these effects can be achieved in a variety of ways with a variety of programs, and all of them involve either 3D CGI or rotoscoping. That is, until now. MainVision's revolutionary Geometry-based effects system allows us a third way to make laser blasts, muzzle flashes, various types of flares (not to be confused with lens flares), and lightsabers - a way with NO rotoscoping, a way that looks better and moves faster.
There are actually two ways to do the sabers, each with a distintly different aesthetic. The method described here is designed to yeild bright, livid sabers similar to those in Return of the Jedi. At the end of this tutorial there is an adendum briefly describing the other methods - which is more appropriate in certain lighting situations
(thus, it is good to know both methods). The main difference between the three methods is the amount of setup time - the method of animation is exactly the same.
So, how are dazzling laser, lightsaber, and flare effects done without rotoscoping. The basic idea is to draw a box on the screen and animate it so that it stays atop your saber/laser blast, then add a handful of effects to make the colors come alive. In this tutorial we will deal first with lightsabers, second with contact flashes and muzzle flashes, and thirdly with laser bolts.
I. Saber Fight: The setup
When setting up to post a saber fight, I find it convinient to set up all the clips first, along with the first frame of the geometry. This way, as I animate the geometry I can actually see the finished product, which allows me to be much more precise. So, let's set it up now. Add your source video to track 1. Now, open your work window on track 1. You should see the first frame of video, totally undecorated.
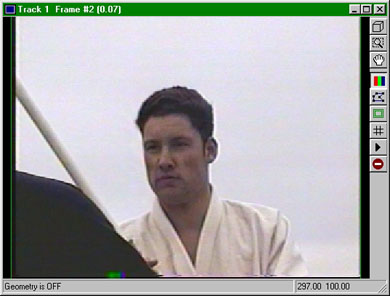
Before we actually draw the geometries, you need to decide what sort of geometry you want. A geometry is basically a flat shape that you draw in the work window. It can be a circle or a multi-sided polygon. What shape you want will depend on two things: 1) how big your video will be, and 2) how close the sabers are to the camera. When they are farther away, as in the pic above, a square usually works fine. Moreover, since our method does automatic tip-rounding, it will only be necessary to work with larger geometries if the end of the saber blade is sticking right into the camera and is fairly close. Otherwise, stick with the standard box - they look just as nice and take much less time to do.
1. Create Geometries
Now let's draw the geometries. There are two saber blades in the film. Draw one geometry (right click in the work window and select Create -> Geometry -> Box [or Contour if you want more than four points on your shape]). Now click on the window and drag your geometry out into a square where you can see all 4 vertices (corners). Now, move the geometry (right click -> Move) so that it outlines one of the sabers (do this by deselecting the geometry, then clicking on and dragging one vertex at a time to where
you want them to go. You will discover that the geometry is totally reshapable and resizable and will conform easily to your saber). Now, repeat this process with the other saber (if it is visible in the current frame - if not, leave it in the black workspace outside the frame). Now draw one more geometry and leave it in the black workspace outside of the frame. You'll need it later, as it will be your most valuable friend when something passes between the camera and the saber. So, now that you?ve done that, you should
have something looking roughly like this:

BTW, the button on the left with the funky geometry on it toggles the
hide/show geometry feature.
2. Fill Effect
Now, if you willl refer back to the first picture for a moment, I?ll continue
with the setup.
On track 2, add a Fill effect (Clips->Geometry Shading -> Fill Shape). This is what it should look like:
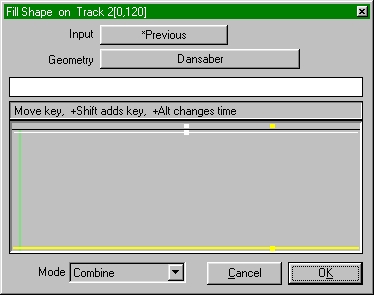
The little bars and keys in the window control opacity (white) and smoothness
(yellow). Leave them at their default positions. In order to change the color from the default blue to the desired white, click on the color bar and select the appropriate color from the pallate that comes up (R255, G255, B255). To assign it to a Geometry click on the blank button marked "Geometry" and select the appropriate one from the list.
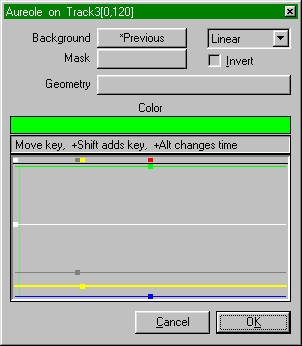
3. Adding the Aura
On the next track, add an Aureole effect (Complex Filtering -> Aureole). Change the color to the color you want for your first saber (I'm using green here), and slide the Internal Opacity (grey) key so that it appears as below. Leave all else at default.
4. Check your work
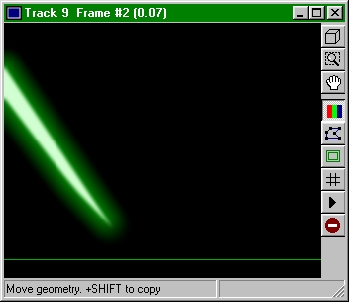
You should be doing this every step of the way anyway, but if you haven't been thus far now is a good time. Open up the work window on track 4 and check your work, you should have something resembling this:
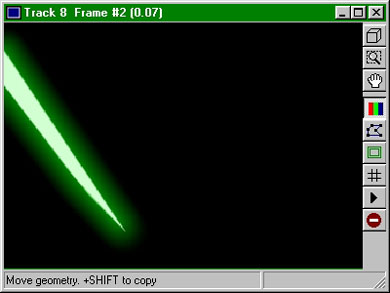
Looks passable, but not great. We're halfway through the effect's creation.
5. Gaussian Blur
The next step is to apply, on track 5, a Gaussian blur (Filtering -> Blur). That will give us the beautiful rounded tips and illusion of energy saturation. Here is what the clip should look like when set up properly:

The result should look like this:
Continue to next page.

![[TFN FanFilms Now On YouTube.com]](/fanfilms/images/fanfilm-youtube.jpg)