| |
(Continued)
5. Generating The Auras
Although a lightsaber blade is always white, it has a soft, colored, transparent aura around it which suggests the color of the blade.

5a. (You now should be in Photoshop, editing the file "Blades With Auras".) Select Filters > Gaussian Blur and do a blur about equal to your line width -- in this case, 2.0.
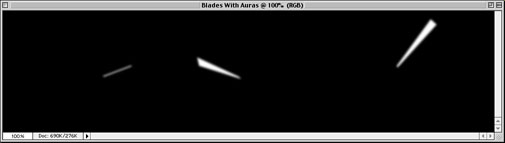
5b. Select Image > Adjust > Levels and change the lower input level to 30, and the upper input level to 50. Then click OK.

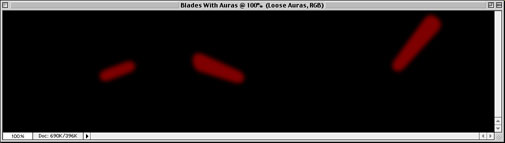
5c. Select Layer > Duplicate to create a copy of the Background layer. Name the new layer Loose Auras. For now, don't worry about the fact that the Loose Auras layer is on top. Make sure the Loose Auras layer is selected before proceeding to the next step.
5d. Select Filter > Blur > Gaussian Blur, and choose a blur level about twice your line width -- in this case, 4.0. Click OK.
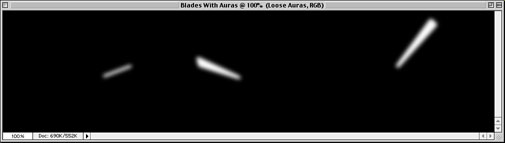
5e. Select Image > Adjust > Levels and change the upper input level to 10. Then click OK.
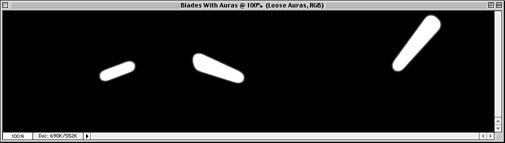
5f. Repeat step 5d (Gaussian Blur 4.0).
5g. Select Image > Adjust > Levels and drop the upper output levels of the Red, Green, and Blue channels individually, to make the aura color of your choice. In this case, I will drop the Green and Blue upper output levels to 0, but leave the Red channel alone. (255,0,0). If you want a blue saber, use (0,127,255). For green, use (0,255,0). Then click OK.
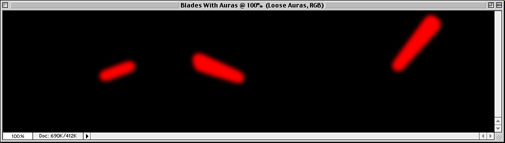
5h. Select Image > Adjust > Levels and change the upper output level to 127. Click OK.
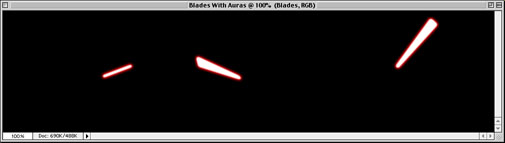
5i. Double-click the "Background" layer and rename it "Blades". Then move it to the top of the layer list. Make sure the Blades layer is selected before proceeding to the next step.

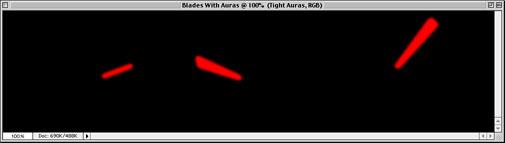
5j. Select Layer > Duplicate to create a copy of the Blades layer. Name the new layer Tight Auras. For now, don't worry about the fact that the Tight Auras layer is on top. Make sure the Tight Auras layer is selected before proceeding to the next step.

5k. Select Filter > Blur > Gaussian Blur, and choose a blur level about half your line width -- in this case, 1.0. Click OK.

5l. Select Image > Adjust > Levels and change the upper input level to 10. Then click OK.

5m. Select Filter > Blur > Gaussian Blur, and choose a blur level about equal to your line width -- in this case, 2.0. Click OK.
5n. Drop the individual Red, Green, and Blue upper output levels exactly the same as you did in step 5g.
5o. Drag the Blades layer to the top of the list. Make sure the Blades layer is selected before proceeding to the next step.
5p. Select Filter > Blur > Gaussian Blur, and choose a blur level about 3/8 your line width -- in this case, 0.75. Then click OK.
5q. The Blades layer should currently be selected -- change its mode from "Normal" to "Screen". (If you are using Photoshop LE, you will not be able to do this -- skip to step 5t now.)
5r. Select the Tight Auras layer and change its mode to Screen.

5s. Select Layer > Flatten Image. Then select File > Save.
5t. This step is for users of Photoshop LE only -- otherwise skip to step 6. Since the Screen mode is unavailable, do this instead: (1) Hide the Blades layer by turning off its eye icon in the layers list. (2) Select the Tight Auras layer and change its opacity to 50%. (3) Select Layer > Merge Layers. (4) Select Image > Adjust > Levels and change the upper input level to 127. Click OK. (5) Unhide the Blades layer and select it, then change its opacity to 50%. (7) Select Layer > Flatten Image. (8) Select Image > Adjust > Levels and change the upper input level to 127. Click OK. (9) Select File > Save.
6. Compositing The Final Results
6a. Select Select > All, then select Edit > Copy.
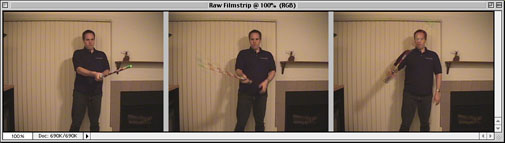
6b. Select File > Open, choose the Raw Filmstrip file, then click the Open button.
6c. Select Edit > Paste.
6d. If you are using Photoshop LE, skip to step 6g.
6e. Change the top layer's mode to Screen. Voila! Your saber blades are composited into the original source material.

6f. Select Layer > Flatten Image.
6g. This step is for users of Photoshop LE only -- otherwise skip to step 6h. (1) Select the top layer. (2) Change its opacity to 50%. (3) Select Layer > Flatten Image. (4) Select Image > Adjust > Levels and change the upper input level to 127. Click OK.
6h. Select File > Save As. Change the name to Filmstrip Ready, and click the Save button -- but first be sure you are saving as a Filmstrip, not as Photoshop.
You can now open Filmstrip Ready in Premiere and use it in your movie! (Note that the results look best if you used the real Screen mode from the full Photoshop. The Photoshop LE cheat is not as realistic.)
Multiple Sabers: If you have multiple sabers visible in this particular clip, then now is the time to go back to step 4 and do it all again for the other beam. But when you get to step 6, composite your new "Beams With Auras" into the results of the first step-6 composite, not into the original Raw Filmstrip. Note: When two saber beams cross, their white centers merge and there is no visual cue as to which one is in front. This is normal -- view any of the Star Wars movies and you'll see that's how it's supposed to look.
Touch-ups: Before you use your final result filmstrip in Premiere, you'll probably want to use Photoshop to touch it up with a few flashy effects. For example, whenever two beams strike each other, there should be a very bright white/yellow flare at the point of contact. This flare should subside over the next 1 or 2 frames. I used a milder flare at the start of the "Henry" clip, to simulate the energy of activating his saber. (This was created with three radial foreground-to-transparent "screen" gradients; a large magenta one, a medium-sized light-magenta one, and a very small white one.) I also airbrushed away the white part of the tube in the very first frame, so it looks like he's just holding a handle with no beam extended from it yet. These little touch-ups might seem superfluous, but they are really vital for creating professional-looking results.
(Another good touch-up idea: When you show a close up of the actor holding his saber at the ready, with just the lowest part of the beam showing, add a little bright spot at the base of the beam, using radial gradients. It would look something like the third frame of "Henry".)
Making your saber extend/rectract: I haven't done this, but for any scene where the saber simply extends or retracts, I would just have no rod present, and draw it in as if there was one. Use some reference point in the picture to make sure you're aiming each piece in the same direction. Faster extension looks cooler and is easier to fake convincingly. If you want to have an actor extend his beam and immediately go into a fight without cutting to a different view, then consider airbrushing out the part of the rod that doesn't belong during the beam-extension frames.
Making your saber slice through things: I would use a short rod -- say about 10 inches past the handle -- and have the actor swing it just past the other actor. Then when you rotoscope it, simply draw the beam at it's full length, using the short rod as a guide.
Well, that's about it. Good luck, and I hope your movie knocks their socks off!
Special thanks to George Lucas and the ILM wizards for dreaming it all up in the first place, and to Jim & Laura, for loaning me their enthusiastic young apprentice Jedi (Sith?).
Editors Note: For more on learning how to paint lightsaber blades
onto digital pictures read Creating Lightsaber Blades in Adobe Photoshop 5.5
by Michael Hobson.
|

![[TFN FanFilms Now On YouTube.com]](/fanfilms/images/fanfilm-youtube.jpg)