Death Stars were probably the most remarkable technological product of the Galactic Empire, a brutal and awesome culmination of the engineering and science of a galaxy-spanning civilisation which was tens of thousands of years old.
In ancient times powerful members of the Sith order were able to wield the dark side of the Force to accomplish the destruction of entire suns, hence Lord Vader's caution that "the ability to destroy a planet is insignificant next to the power of the Force". Nevertheless the Death Stars were probably the most impressive artificial weapons of the modern era until they were superseded by the experimental supernova-inducing Suncrusher device of the Maw research facility [Jedi Search] The Death Star also had a practical advantage over the arcane Sith power: it was purely technological and therefore it did not rely upon the cooperation of gifted Force-sensitive individuals.
The primary mission of the Death Star was more concerned with the threat of force, rather than its exertion. This was to be an integral part of the doctrine of rule through fear, an idea whose chief author and proponent was none other than Grand Moff Tarkin, the regional governor who instigated the Death Star project. Planetary populations were supposed to be cowed by the mere existence of this immense capability. It is possible that only a small number of planets would need to be demonstratively demolished before terror inspired complete civil obdience throughout the galaxy. The philosophy behind the Death Star depended on the intimidated worlds thinking in isolation, not daring to devise any cooperative or rational attack. Unfortunately for the Galactic Empire, rebel forces were able to do precisely this once they obtained detailed technical schematics.
Most second-generation merchandise (including RPG references, STAR WARS Screen Entertainment software, etc.) claims that the two operational battle stations were only 120km and 160km in diameter, but they cite no empirical evidence and these numbers could well have been arbitrarily plucked out of vacuum. Proof in the canon is required.
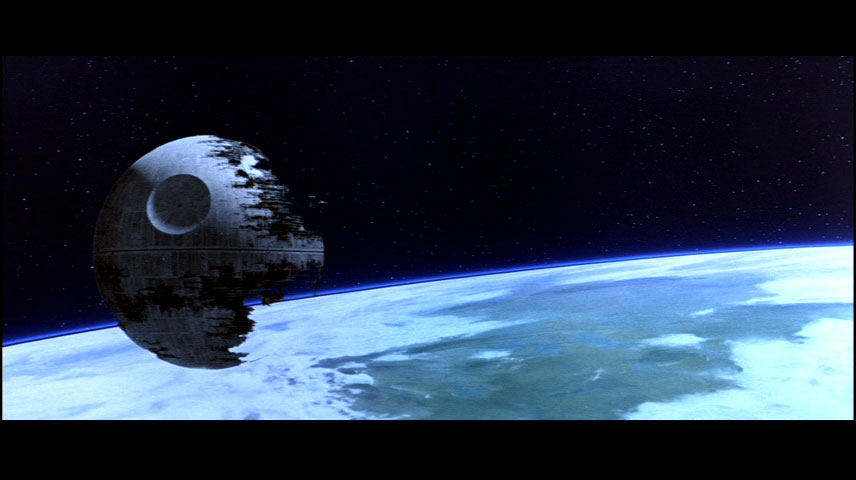
The dimensions of the Death Stars aren't precisely stated anywhere in the absolute canon of STAR WARS. Fortunately there are several indirect lines of evidence which constrain the possible ranges pof the Death Stars' sizes. We know that an inexperienced Luke Skywalker visually mistook the first operational battle station as a "small moon". Obi-Wan Kenobi and Han Solo implicitly conceded that it was as big as a moon and bigger than conventional space stations. Moons in our solar system generally range from hundreds of kilometres to a few thousand kilometres in diameter. The Return of the Jedi novelisation states that the second Death Star was "twice the size" of the first (however big that is), but it is unclear whether this means twice the diameter, twice the area or twice the volume. It is also unclear whether the statement refers to the half-built condition of the station during the Battle of Endor, or the size that unfulfilled final construction would have been. The full size upon completion might have been twice as voluminous again.
We can compare the size of Death Star II with the Lord Vader's flagship Executor which collided disasterously with it at the climax of the Battle of Endor. Unfortunately the dimensions of this class of capital ship is itself in dispute, and measurements of the curvature of the Death Star horizon during the collision scene are imprecise. The curvature of the horizon is so very slight that it is difficult to wrangle the figures to obtain a Death Star diameter of less than a thousand kilometres. Indeed it is fairly easy to derive Death Star dimensions which are comparable to those of a habitable planet, even though we know it to be only the size of a moon. This analysis might be more useful for constraining the size of the Executor than the Death Star. (For further information refer to the Executor commentary.)
 Executor's dive to doom. [Topps widevision; movie screenshots]
The equatorial "waistband" trench of the Death Star II can be compared to the diameter of the whole battle station in photographs taken from astronomical distances. The local area around the docking bays used by the Emperor and Lord Vader can be measured approximately by scaling the shuttle with surrounding features. (The height of a landed shuttle is approximately 23m.) This local area appears to be somewhere inside the waistband trench; which enables us to calculate a lower limit on the size of the Death Star II.
A detailed image of the whole battle station appears in The Art of Star Wars: Episode VI. In this large scan, the polar diameter is 1682 pixels, the equatorial diameter is 1686 pixels and the height of the equatorial trench is 11 pixels (in the well illuminated region near the middle of the picture). That means that the diameter of the Death Star II is about 153±7 times the width of the waistband trench, whatever that may be.
The height of Lord Vader's hangar can be determined from images taken during Luke's escape. In this image the shuttle is about 85 pixels high (extrapolating the additional height of landing gear), and the bay aperture is about 244 pixels high. According to published blueprints, the shuttle is about 22.25m high, and therefore the hangar aperture is 64m high. (Similarly the width of the aperture is approximately 237/42 times the shuttle's closed wingspan, according to this image taken when the shuttle was exactly at the entrance.)
Vader's is the smallest hangar in the vicinity. The Emperor's is 62/18 times higher. The bays are all set back into a rectangular notch, which itself is within a deep notch in the hull of the station. Neglecting the displacement of the hangars away from camera, this image shows that the inner and outer notches are respectively 260/18 and 501/18 times the height of Vader's hangar, or approxoimately 0.92km and 1.8km.
The outer notch cannot be higher than the total height of the equatorial trench. If it were itself the equatorial trench then the entire battle station would have a diameter of about 270km. This is only a lower limit on the size of the Death Star II, because the outer notch is not necessarily the whole trench. Comparing this figure with the result from astrophysical considerations and Richard Edlund's statement in CINEFEX, the outermost visible notch turns out to be a third of the height of the equatorial trench, or less. The top-left corner of one matte painting shows what may be part of the next higher level of notch. Therefore the most realistic picture is for a space station of over 800km diameter, with a ~5.3km equatorial trench containing ~1.8km high notches, within which there are deeper notches of 0.9km height, which contain hangars that are 64m high or less.
Local view of the docking area used by both the Emperor and Lord Vader. Palpatine used the largest hangar; Vader used the smallest illuminated hangar. [The Art of STAR WARS]
Two scans of a matte painting of an area within the waistband trench. The first link has structural labels. The two smallest of at least three nested levels of notches within the trench are visible. [The Art of STAR WARS]
External views of Lord Vader's fatal docking bay. This bay is the smallest of the cluster; apparently the same as the one where Vader originally arrived. (It seems likely that Luke fled in his father's personal shuttle.)
Other views of Vader's docking bay, which are less useful for scaling purposes.
It may be possible to deduce some limits on the sizes of the Death Stars by observing the geometric relationships between the battle stations and standard star destroyers. This comparison could be made from an image showing a star destroyer and a Death Star in physical proximity, or circumstantially from something known about how these objects interact.
If a star destroyer can dock with a Death Star then it must occur at either a mooring tower several hundred metres high, or a similarly deep hangar. The equatorial trench might be able to conceal a cavity of the required size (a mile long and at least a third of a mile high), although no such cavity is obvious in presently available images. The available images fall into two categories of inadequacy: fully global views at astronomical scales that show the equatorial structures as pattern of barely distinguishable lights; and close views showing limited local regions (showing only a few shuttle-sized hangars). Larger hangars could exist [unseen in the movies] at other longitudes. However if it could be proven that any of the waistband features are star destroyer berths then we could infer that the equatorial trench spans at least 400m (fitting the tightest possible alignment of the destroyer) and probably over a mile (with some margin for safety).
Amongst the concept artworks of ROTJ there are two pieces showing a star destroyer cruising above the surface of the Death Star II. There is one concept sketch in the ROTJ Sketchbook, and a painting in The Art of STAR WARS.] The ship casts a shadow onto the battle station's surface near a trench. The trench is somewhat wider than the shadow by a factor between 1.0 (painting) and 1.7(sketch). Therefore the trench is at least a mile across, the length of the star destroyer. If it is the equatorial waistband trench then we can compare this measurement with the whole-disk views and thereby derive a lower estimate for the global diameter. If, rather, it is one of the smaller meridional or latitudinal trenchs (which are invisibly small in whole-disk views) then we have an even stronger lower limit to the station's size: the station would have to be several times larger than implied in an equatorial comparison. Of course this evidence is not definitive because the artists of ILM could have resized the Death Star II any number of times before settling on the final film version.
The trench width is 1.4 ± 0.4 times the one-mile length of the shadow. The global diameter is 153 ± 7 times the width of the Death Star II's equatorial trench. Assuming that the sketch is equatorial, and that it accurately reflects the final scaling of the movie, the diameter of Death Star II would be
D = 345 ± 100 km. This estimate is probably good to within an order of magnitude, since althogh the sketched scene was cut from the movie, it is unlikely that the artists could have revised the scale up or down by more than a factor of a few times.
A star destroyer casts its shadow near what may be Death Star II's waistband trench. Greyscale and colour alternative views of the destroyer, its shadow and the trench.
astrophysical considerations [DS2]
More useful size comparisons can be made between the Endor Moon and the Death Star in its orbit. Measurements of the Mon Calamari tactical holographic displays of the system and actual photographs of the two globes consistently give a diameter for the moon which is 11.5 ± 0.1 times that of the Death Star. The absolute size of the moon remains to be determined.
The Endor Moon must be of a size which is approximately equal to that of the Earth (which has a radius of 6378 km). If it were very much smaller then it would not have enough gravity to hold an atmosphere thick enough for human comfort, let alone thick enough to allow Ewok glider craft to fly. The fact that the cumbersome-looking gliders do work at least as well as a (terrestrial) parachute whilst having only a fraction of the surface area suggests that Endorian gravity is somewhat lower than on a standard human world. Otherwise (or additionally) the air pressure may be exceptionally high (though this would tend to imply a world larger than Earth).
The two main factors determining a world's surface gravity are its composition and its total mass. The least dense solids available to compose a planet are icy compounds, composed of the lightest chemical elements; they may have densities around 1 g / cm³. However the habitable temperature of the Santuary Moon means that cannot be made of ices (such a moon would have evaporated aeons ago). Silicates (rocky solids) typically have densities of 1½ - 3 g / cm³. Metals like iron and nickel have densities around 6 g / cm³, and they are the most stable and favoured end-products of the nuclear reactions occurring in multiple generations of stars (which provide the raw materials forming new planets). Heavier chemical elements, like uranium, are disfavoured in stellar nucleosynthesis. They are now, and always will remain, only a tiny fraction of the mass of the universe. Though their densities may range between 10 and 20 g / cm³, their cosmic rarity means that they can only comprise a negligible fraction of the mass of a natural planet or moon. The smallest celestial objects have average densities comparable to the intrinsic densities of their constituents, but more massive planets are slightly compressed under their own weight. Self-gravity has compressed the Earth to a mean density of about 5.5 g / cm³. A smaller world like Mars (3397 km radius, 3.9 g / cm³ density) is less self-compressed; and a larger terrestrial planet would be slightly more compressed than Earth.
The Endor moon needs to have a surface gravity strong enough for humans to move in comfort, and an escape velocity comparable to Earth's in order to retain a breathable atmosphere [for detailed discussion, see Planets: Habitability]. The two extremes of viable solutions are:
In the latter case, the Endor moon would be intermediate between Earth and Mars, but closest to the size of Earth. Assuming a bulk composition consistent with known terrestrial planets and a best estimate of 2/3 terrestrial surface gravity, the sanctuary moon's average density would be about 4 - 5 g / cm³ implying a radius of roughly 5200 km (80% that of Earth). This is a very approximate value and might vary by hundreds of kilometres depending on the weighting of the particular assumptions. However this value serves as a strongly indicative lower limit because a light-element composition would imply a greater global radius, and a heavy-element composition is astronomically unattainable (and couldn't shrink the diameter by much better than half). The moon's radius could not conceivably be less than about four-thousand kilometres.
If there is nothing abnormal and artificial about the moon's compostion then the diameter of the Death Star II is scaled to approximately
D = 900 ± 60 km .
This is very much greater than the unsupported estimates that appear most often in the literature (contrived by West End Games and duplicated uncritically in later references). The Death Star Technical Companion and The Movie Trilogy Sourcebook claim that the diameters of the first and second Death Stars were only 120km and 160km respectively. If the Death Star II were this tiny then the sanctuary moon would scale down to be barely larger than half the diameter Earth's moon and it then could not possibly hold a life-sustaining atmosphere. The 160km scaling of DS2 is untenable. Q.E.D.
The constraints of planetary physics require than the Endor Moon be much larger than Earth's moon and close to the size of Earth itself. Because of its fixed relative scale, the Death Star II must have a diameter greater than about 900km.
From where the rebel fleet emerges from hyperspace the relative dimensions of the Death Star II and the sanctuary moon of Endor were clearly visible.
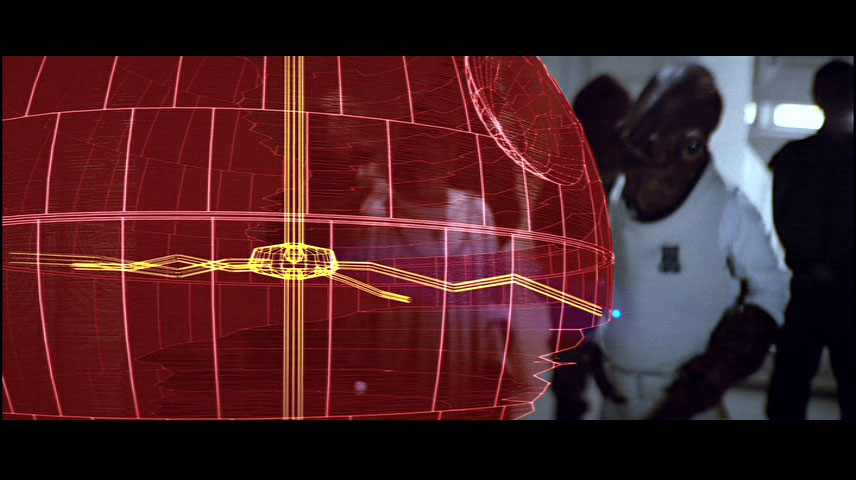
Identical dimensions are seen in the rebels' tactical schematic hologram of the construction site.
Closeup schematics of the moon and battle station.
One of the early design sketches for the incomplete Death Star at Endor was published in Return of the Jedi Sketchbook. This image clearly indicates a diameter of only a hundred miles, approximately equal to the 160km value adopted by West End Games. However there is firm evidence that the artists of the film eventually dropped this early unambitious figure, upgrading the battle station to a greater set of dimensions matching the results of the physical study above. (See the CINEFEX report.)
On the other hand this drawing might be a good indication of the size of the Death Star I. The size of the original battle station should have been known to the artists who created Return of the Jedi. The Death Star II probably was not designed to be any smaller than its predecessor. It seems plausible that the second Death Star was originally assumed to be the same size as the first, but upgraded five-fold at a later point. Therefore this sketch indirectly and tentatively suggests that the first Death Star was 160km in diameter. This is consistent with the two lines of evidence derived from the geometry of the trench run.
Early concept sketch for the second Death Star [ROTJ Sketchbook].
The July 1983 issue of CINEFEX contains an interview with Richard Edlund of Industrial Light & Magic, regarding the effects of Return of the Jedi. In this interview, on pp.7-8 he says:
" The Deathstar, I think, will be a lot more interesting than the one in the first Star Wars — mainly because it is under construction ... Plus, it will be MUCH bigger. In Star Wars, it was really difficult to establish the scale. It was supposed to be miles in diameter, but with a full sphere it was hard to tell. The NEW one is SUPPOSED TO BE MORE like FIVE HUNDRED MILES in diameter, but since we're not dealing with a sphere all the time, we'll be able to establish landmarks and get a better sense of scale. "
This is in excellent agreement with the physically-derived estimate of the Death Star diameter, which is equivalent to somewhere between 530 miles and 590 miles. CINEFEX flatly contradicts the 100-mile diameter estimate in many second-generation sources [e.g. The Death Star Technical Companion]. As a final report by the special effects artists who made the movie, the CINEFEX article supersedes the earlier, preliminary scaling sketch reproduced in the ROTJ Sketchbook.
Rebel starfighters at the Battle of Yavin approached the target thermal exhaust port by travelling under the cover of a minor surface trench. According to the novelisation of A New Hope the trench was in the vicinity of the north pole of the battle station. The exhaust port was located at one end of the trench and the rebels entered at a distant section, which was not necessarily the opposite end.
The rebel targetting computer displays indicated a range to the port. This range counter was a six-digit number. The Art of STAR WARS Episode IV: A New Hope contains illustrations of several frames of the targetting-computer display, which allow the range numbers to be observed. The largest number shown is slightly greater than 32600, which corresponds to approximately two thirds of the length of the attack run according to the red vertical progress markers in the tactical image. The full length of the trench must be greater than forty-nine thousand of these units of distance.
In the pilot briefing prior to the battle, General Dodonna stated the size of the exhaust port in terms of the metric metre. It is therefore reasonable to assume that the metre is the standard unit of length in the Rebel Alliance's military, as it is for most purposes on Earth. The length of the attack run through the polar trench therefore is at least 49000m long. Hence the total length of this minor trench cannot be shorter than 49km.
The devil's advocate might suggest that the numbers on the target scopes were arbitrary, merely put there to give the impression that the starfighters were approaching their goal at high speed. However any consideration of the fighters' velocities gives general support to my interpretation of the figures. The rebel ships must have been travelling at speeds at least comparable to those of terrestrial airfighters of World War II, which gave artistic inspiration to the Battle of Yavin. The rate at which trench walls rush past the rebels' cockpits looks consistent with this kind of speed. If the trench was not at least least several dozen kilometres long then the fighters would have flown through the entire length in much less than the minutes of time taken on film. If the trench was much longer than a few dozens of kilometres then the whole battle station would need to be much bigger than a mere "small moon" in order to fit the trench. These considerations indicate that the artists who made the film probably did need to consciously choose a length scale.
The starfighters' point of entry into the trench was somewhere in the north polar region, or at least well away from the Death Star's equator. In order to be considered a polar feature, the trench should not extend to any point which is closer to the equator than the north pole. This very liberal restriction implies that the length of the trench is no more than an eighth of the total circumference of the battle station, and more probably less. This indicates that the diameter of Death Star I was greater than 125km. (It is noteworthy that this extreme lower limit is approximately equal to the 120km diameter adopted by West End Games.) Depending on how small an arc on the globe is really subtended by the trench, the station can easily be many times greater than this diameter.
The schematic animation presented to rebel pilots indicated several trenches radiating out from the north pole of the battle station. The fighters' point of entry, near the southern extreme of the trench, was highlighted. In these images the trench spans between a third and a half of the distance between equator and pole. This yields a diameter of between 125km and 190km.
 Rebel target scope at a range of over 32.6 km from the exhaust port.
Several polar trenches are shown in the rebel schematic animation. They radiate out from somewhere near the pole to approximately halfway towards the equator.
The schematic animation presented to rebel starfighter pilots at Yavin revels the width of the trench in relation to the total diameter of the Death Star. A sequence of animation frames zoom in from a whole-disk view of the battle station to the details of the trench. By tracking the changing magnification of this sequence, it is found that the width of the trench is less than or equal to 1/2207 of the global diameter. The trench was wide enough for three TIE fighters to fly abreast: several tens of metres. It is consistent with the station having a diameter between 100 and 200km: if the global diameter were 125km then the trench would be 57m wide; if the station were 164km across then the trench would span 74m. This is in good agreement with independent evidence including: the size derived from the length of the trench, and the statement from ILM in Bantha Tracks.
Any independent measurements of the width of the trench would provide valuable corroboration. One of the crucial frames of General Dodonna's animation shows the thermal exhaust port ("two metres wide") and the surrounding trench features. It is possible to measure the width of the vent in relation to the trench width. This is not very precise, because the vent is a small feature compared to the pixel size in available images. Present measurements indicate that the width of the trench is:
trench width = 59 ± 17 m
Assuming that this is nearly the average width of the trench, one can derive a lower limit to the Death Star I diameter:
D > 131 ± 38 km
General Dodonna's rotating schematic of the Death Star globe.
Polar trenches displayed on globe. The hemisphere is divided into twelve segments of longitude by the twelve meridional trenches. The trenches appear not to extend all the way to the pole. The thermal exhaust port is at the end of the trench closest to the pole. The vicinity of the target trench is a highlighted square.
Magnification of the highlighted target trench entry point.
Magnification of the entry point of the trench.
Trench schematic details.
The trench is wide enough for three TIEs flying in formation.
The thermal exhuast port highlighted at the end of General Dodonna's briefing. This image provides a direct comparison between the diameter of the port and the width of the trench.
At some time during the first-generation classic era of STAR WARS publishing, long before the advent of the Roleplaying Game, a set of blueprints were published, including diagrams depicting the Death Star and star destroyer. The plans in The Technical Book of Science Fiction Films indicate a diameter for Death Star I of only 67.375km. This is less than half of the size measurable from the trench run and General Dodonna's [intratextual] schematics, and only slightly more than half of the value quoted by West End Games and its derivatives.
The reliability of the scaling in these blueprints can be judged from the contemporary blueprints of a star destroyer, a better known and measured vessel. The 1978 destroyer blueprints underestimate the ship's length: only 486.5m rather than the one mile (approximately 1609m) that is apparent in the movies (e.g. measured in comparisons with destroyers with the Millennium Falcon and Lord Vader's Lambda-class shuttle.) and stated in most second-generation publications.
The error may have arisen through the misuse of a preliminary scale diagram drawn during the initial design of vessels in A New Hope. (For example, there exists a preliminary scale chart that had an underscaled blockade runner and equivalently underscaled star destroyer.) In its (extratextual) design evolution, the star destroyer grew from a small-scale gun-bristled prototype up to the final vast vessel with invisibly-small weapons [e.g. documented in From STAR WARS to Indiana Jones].
Despite the wrong size, the star destroyer blueprints retain some credibility. The proportions roughly match those of the canonical vessel. Some important features differ (e.g. the forward hangar), but other features are well done, including dorsal details that were invisible in ANH. This implies that the draftsman did work from some priviledged information. Perhaps the blueprints show a hybrid of the model seen on film, and superseded concept design sketches. In summary, the star destroyer blueprints are conceptually good in many respects but show an over-dependence on early designs which were superseded in the final film version. (In those days it would have been technologically difficult to collect adequate reference photos, even within Lucasfilm itself.)
It is harder to guess the exact reason why the Death Star blueprints underestimate the battle station's diameter. It may have something to do with early production art of A New Hope which is not available to public examination at this time. Perhaps the 67.375km figure was invented arbitrarily without considering any evidence, like the later statistics from WEG roleplaying games.
The Death Star blueprints are easier to dismiss as evidence, because they condemn themselves with more serious inconsistencies than the star destroyer blueprints. The "typical docking bay" in the equatorial trench is drawn many times too large: it takes up nearly the entire span of the trench, whereas the relatively tiny lights seen in the film are mere indentations visible only at close range and fitting in several rows within the trench width. The polar trench has been exagerrated until it is half the width of the equatorial trench. In the film, no polar trenchs is wide enough to be visible from an astronomical distance.
If we upscale the Death Star I blueprints by the same magnification as the star destroyer blueprints need, the global diameter becomes 222km. This is slightly beyond the size range suggested by the target scope and trench measurements. Perhaps there is a reason why both blueprints are underscaled by a similar amount? After all the intervening years, it may now be impossible to reconstruct what happened.
First-generation published blueprints of the Death Star: front and top views; interior structure and weaponry.
Shuttle-sized hangar bays (illuminated) are very small compared to the span of the waistband trench.
STAR WARS Incredible Cross-Sections shows the interior structure of the original Death Star, in both schematic form and a coloured perspective drawing. The book states a diameter of 160km, which agrees with results calculated here, but one of the most interesting aspects is the treatment of the main reactor system. Compared to the Death Star II schematics used by the rebels in Return of the Jedi, this Death Star's core is much larger in proportion to the whole sphere. In the first Death Star the main reactor chamber is 36% of the total diameter, and the actual power core is about ten percent of the diameter. In the second Death Star, the reactor chamber and core are 13% and 3% of the diameter respectively.
The second station was unarguably larger and more powerful, and therefore must have had a reactor of at least the same size as its predecessor. As a lower limit, if we assume that the power systems were identical, then the diameter of the Death Star II must be at least 2.8 to 3.1 times the original's 160km diameter. Accounting for the need for a bigger reactor, the size ratio of five or six times (due to independent physical evidence and the CINEFEX interview above) is comfortably allowable.
A recent flight simulation computer game from LucasArts, X-Wing: Alliance, contains a mission representing some aspects of the Battle of Endor. The player is able to fly into the main reactor chamber of the new Death Star. The target scope shows a range in kilometres which could in principle be used to determine the dimensions of that interior space. As with the deductions from STAR WARS Incredible Cross Sections above, this size would allow a determination of the size of the station as represented in the game. This is merely secondary evidence of course, but it would be nice if it was in accord with the canonical dimensions of the Death Star II as shown in the movie.
Bantha Tracks #6 [Autumn 1979], the official STAR WARS fan club magazine of the first generation, contains information about the scaling of miniature models in A New Hope, as told by Grant McCune, Chief Model Maker for the movie:
"The scale on the models ranged from 1:8 on the life pod and Lifepod Bay to 1:16 for most of the space vehicles to an incredible 1:180,000 for the Death Star (making the full size Death Star 102+ miles in diameter)"
Thus the first Death Star is a little over 164km in diameter, according to one of the men responsible for correct scaling in the movie, in his own words, spoken at the time when it was fresh in everyones' minds. If the model was exactly three feet in diameter, as seems likely as a round figure for the sphere's construction, then the true size of the battle station would be 102.2727 miles.
Inside the Worlds of the Star Wars Trilogy [hereafter ITW] states the diameter of the Death Star II as 900km or 550miles. This is consistent with the measurable movie evidence and with the CINEFEX report of Richard Edlund.
The table below is a summary of the various results for the diameters of the two battle stations seen in the films. Results that are derived from primary, canonical evidence are listed with a (†) symbol and are grouped top of the table. Secondary sources (official non-canon) and the more indirect inferences from canonical imagery are listed lower. Although the blueprints have intriguing features which show some insight and perhaps some reference to early modelling by ILM, their stated dimensions are hardly consistent with other available evidence. The roleplaying game figures may be arbitrary inventions without reference to any primary evidence; the only support for these figures is a (possibly coincidental) corroboration with one early production sketch of the second Death Star. However this sketch, shown in the Return of the Jedi Sketchbook, almost certainly describes an early concept that was eventually discarded in favour of a more visibly impressive, lone battle station over the Endor moon.
The presently-available evidence indicates that the diameter of the first Death Star is in the range 160 - 165km, although the purely canonical evidence cannot strictly rule out a smaller figure close to the commonly published 120km value. The diameter of the Death Star II is in the range 800km - 960km. Thus the roleplaying game estimate for the size of the first Death Star is not far from the truth but the second battle station has been grossly underestimated. The last published size of the Death Star II, 900km, is acceptibly realistic.
| evidence/source | Death Star I | Death Star II |
|---|---|---|
| Executor collision† | - | indeterminate |
| planetary physics† | - | 900 ± 60 km |
| CINEFEX† | "miles" | > 800 km |
| meridional trench length† | 125 km - 190 km | - |
| meridional trench width† | > 131 ± 38 km | - |
| equatorial trench width† | - | > 270 km |
| Inside the Worlds | - | 900km |
| SWICS diagrams | 160 km | > 450 km |
| Bantha Tracks | 164 km | - |
| concept art: destroyer shadow | - | > 345 ± 100 km |
| ROTJ Sketchbook annotation | ≤ 160km | 160 km |
| statistics in roleplaying books | 120 km | 160 km |
| blueprints | 67.375 km | - |
| blueprints (rescaled after ISD fudge) | 222 km | - |
One of the brilliant points of Starlog's STAR WARS Technical Journal was the examination of the internal symmetry of the Death Stars. The structural symmetry reflects the local orientation of artificial gravity within particular parts of the battle station.
Over most of the outer surface the gravity is directed towards the core, just like that of a natural planet. The decks are oriented accordingly and the surface is festooned with turbolaser towers and skyscrapers of various kinds, like part of a city. This arrangement caters for the psychological comfort of the crew, as humans have evolved as planet-bound beings.
An exception to this symmetry exists in the equatorial waistband trench. There the gravity is directed parallel to the rotational axis of the sphere so that one hemisphere is "up" and the other is "down". This arrangement seems designed to facilitate the takeoff and landing of starships. A pilot faces his ship directly into the docking bay, moving "horizontally" in the local gravitational frame. Presumably this is much easier than the alternative "vertical" ascent/descent experienced in a planet-like gravitational field.
This planar, axisymmetric layout seems to prevail throughout most of the volume of the Death Star. The exposed interior of the Death Star II showed a distinctive planar cylindrical grain. If the decks and mechanisms of this region had a planet-like gravity then we would expect layering in spherical shells instead. In fact the region of spherical symmetry seems only to involve the outermost skin of the station.
Crossing the interface between regions of different gravity could be discomforting for the crew. The interfaces are never shown on film, but they might be similar to the access tube leading to the laser cannon stations of the Millennium Falcon, where the gunner climbs through regions of mutually-perpendicular gravity by clinging to a ladder. Perhaps regions of different gravity in the Death Star are unconnected and self-contained, preventing the disorientation problems altogether. Perhaps there are corridors which curve around gently, with the direction of gravity varying smoothly from one region to the other. Perhaps the adjustment is made via a ride in a turbolift. Turbolifts are already likely to have their own inertial dampers and self-contained artificial gravity systems for the comfort and safety of occupants.
Full-disk view of Death Star II. Note axisymmetric planar structure of the interior and the shell-like structure of the outer skin. [Star Wars to Indiana Jones]
Death Star structural schematic [Death Star Technical Companion]
STAR WARS Technical Journal structure diagram generally agrees with WEG, at least with regard to the basic symmetry.
Mandel's early blueprints imply structures which are unseen in ROTJ.
The nett gravitational field of each battle station is distinct from the local artificial gravity of any particular subsection. The natural, long-range field depends on the station's total mass and the observer's distance from the center of mass, like the external gravity field of a real moon.
The contribution to the station's natural gravity by the mass-energy of its power systems dominates over that of the station's basic structure. If the station was empty of fuel then it would act like a small moon of unusually low density. With the addition of sufficient mass-energy to power the destruction of several worlds, the nett gravity might approach that of a small terrestrial planets.
Without detailed knowledge about how much power the Death Stars typically carried at a given time, it is impossible to guess the station's ability to retain an external atmosphere. The argument is redundant however, since atmospheric containment shields applied at hangar apertures and the use of supplementary air canisters by stormtroopers on extended outdoor duty indicate that the station designers intended to maintain an external vacuum and keep all of the atmosphere internal. The fact that neither battle station showed the slightest degree of atmospheric haze near the surface shows that conditions on the outer hull were indeed quite airless.
Stormtroopers are equipped with supplementary air canister backpack for prolonged vacuum work. Normal stormtrooper armour is an airtight spacesuit with enough air to last through a typical combat mission. [SW Chronicles; movie screenshot]
The main reactor consisted of a large toroidal plasma-filled space surrounding a spheroidal structure at the very core of the battle station. This bulb appeared on the Yavin rebel pilots' briefing animation as having a twelve-fold internal symmetry and a diameter of just less than a tenth of that of the whole station. The newer station's main reactor, seen in great detail in Return of the Jedi, is filled with a bewildering array of fine structures and mechanisms. The functions of most of these can only be guessed at, but one feature known as "the power regulator on the north tower" was critical to the destruction of Death Star II.
It is interesting to note the apparently great differences between the reactor assembly structures described by Death Star Technical Companion and STAR WARS Technical Journal. The WEG product indicates much more extensive structure connected with the main reactor. However both references seem to show approximately the same size for the main toroidal chamber as seen in the rebels' holographic schematics. That Death Star I and its successor have reactor chambers which are equivalent in proportion to the whole globe suggest that the power needs of the station scale like the total volume.
STAR WARS Incredible Cross-Sections gives an unambiguous schematic and perspective cross-section of the first Death Star, in which the reactor system seems proportionately bigger than the one in the Death Star II. In the older station, the reactor core and the chamber surrounding it are 36% and about 10% of the total diameter; in the newer version the equivalent features are about 13% and 3% of the larger diameter. The battle station size seems to have been increased by a greater multiple than the increase in the size of the main reactor systems. Perhaps the proportions in Death Star Technical Companion and STAR WARS Technical Journal can be excused as reflecting the design for an ideal complete version of the Death Star II.
In order to recharge the superlaser for a minimal planet-destroying blast once per day, the main reactor must be able to generate power at 2 x 1027Watts apart from the station's running needs, as detailed below. This power is approximately five times the continuous output of the Sun. The power systems of Death Star II had an even greater yield in order to provide greater power and fire rate for the improved superlaser.
The energy available per kilogram of fuel is too low for fusion to be practical as the station's primary power source; even ordinary states of antimatter arguably may be insufficiently compact to be practical. Dense and exotic forms of mass-energy are probably required, perhaps involving superscientific gravitic technologies. Although the nature of these fields and materials remains open to our speculation, STAR WARS Incredible Cross-Sections gives it a name: "hypermatter".
The bulb of the main reactor core, with two power regulator towers. [Star Wars to Indiana Jones; movie screenshots]
Reactor details after Wedge Antilles' attack on the "power regulator on the north tower", but just prior to the main detonation. Initially the flames appear to propagate circularly from west to east. Millennium Falcon flees as the reactor explodes. [ROTJ; Topps' Widevision cards]
Schematics showing the size of the first Death Star's main reactor in relation to the surface. General Dodonna's (canonical) tactical animation [ANH] showing a growing chain reacton propagating towards the bulb of the main reactor. Secondary but more detailed reference schematic [Star Wars Technical Journal vol. 2].
Closeups of the rebels' tactical hologram for the new Death Star, showing the main reactor chamber and the four major shafts leading from there to the surface.
Four shafts of several dozen metres' girth descended from evenly spaced near-equatorial points on the surface of Death Star II and converged on the main reactor. At least two of the apertures were in the southern hemisphere and at least one was in the northern hemisphere. Each of these shafts exhibited about five sudden kinks of about fifteen degrees before reaching the core. There were additional subsidiary shafts branching off in various directions, some of which allowed return passage to the surface. The purpose of these shafts is unknown, but their walls were lined with all kinds of intriguing mechanisms. The absence of the distictive decor of the inhabited sections of the battle stations hints that these shafts were exposed to vacuum just like the station's outer hull.
Schematic holograms indicating the four shafts.
Rebel freighter entering one shaft; TIE interceptors pursue inside; inner end of the shaft, near main reactor explosion.
Repetitively layered panels form a passage just outside the reactor core chamber of the Death Star II. Similar structures appear in a branch tunnel that some rebel fighters followed back to the surface and the fleet engagement. [These structures are known as the "capacitors" in the SWCCG game cards].
An X-Wing flies through the layered apertures into the main reactor core. [Topps' Widevision]
Schematic holograms of the second Death Star also show an immense cylindrical column running from pole to pole through the main reactor. The function of this feature is unknown, but its size suggests that it plays an important role. Its symmetry hints that it might be connected with the Death Star's rotational capabilities. The Death Star Technical Companion suggests that it is associated with power distribution.
Close view in the rebels' schematic hologram.
A seemingly-insignificant thermal exhaust port, of only two metres diameter, was the means to the destruction of the first Death Star. The feature was intended to help dissipate excess heat from power systems deep within the bowls of the station. The port was set at the end of a minor meridional surface trench in the vicinity of the north pole of the battle station. A more prominent feature, the "main port", was said to be nearby, possibly at the pole.
In the wake of this disaster Bevel Lemelisk, chief designer of the battle station, modified his basic design to eliminate the vulnerability. In its place the Death Star II possessed millions of millimetre-sized tubes dispersed over the entire surface. The conduits connected to each of these untargetably tiny vents were equipped with emergency baffle mechanisms to block any excess power surge. The kind of chain reaction which destroyed Lemelisk's first battle station could never occur in the second.
The flight and entry of proton torpedos into the thermal exhaust port: in simulation and in practice.
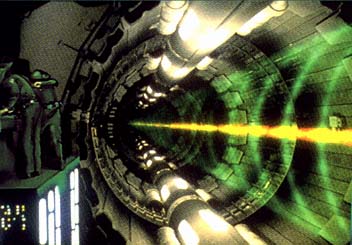
Tributary superlaser shafts were immensely-long tubes of about eight metres' diameter. Naval crewman operate consoles at stations just a few metres from the beams. They survive despite the lateral light emissions from the beam, and this places a tight limit on the radiated power per unit length. The crewmen are not affected by any air heated by the beam's passage either. Either the shaft is a vacuum and is shielded from the air-filled space where the men stand, or else energy losses from the beam in contact with the air are negligible.
It is interesting to note that the shafts are horizontal with respect to the local gravity experienced by the crewmen. If the beam is directed towards the station's surface then the control console could be in the inner region of the station where the decks are aligned with the equatorial plane, not the outer levels which have spherically concentric decks and core-directed gravity like on a planet. Alternatively, this control console could be anywhere in the station if it has its own special local direction of gravity which is purposely oriented in relation to the beam shaft.
If the local gravity is not deliberately related to the beam direction then the beam seen in the shaft cannot be an internal extension of any of the eight beams emerging from the station's surface. Those beams meet the spherical surface of the station at angles that are neither parallel to nor perpendicular to the surface decks. Perhaps those eight external beams are not the finest tributaries, but are themselves formed from lesser beams, inclined at other angles, hidden below the shell of the Death Star.
A superlaser tributary beam shaft, as seen from a control station. The beam seems to be parallel to the plane of the deck.
Lord Vader made one of these very useful when he eventually decided to proactively depose the Emperor. His children were inconvenienced by a similar air-shaft during their escape from Grand Moff Tarkin's Death Star, four years earlier. These vast open spaces allowed for the collection of air from the local ducts and corridors.
Some important power conduits, like this one for a tractor beam projector, are routed through air shafts. Is this for the sake of air cooling, or easier maintenance access?
The air shafts are extensive enough that many ordinary corridors must cross them. To make the approach unmistakeable, the approach to a shaft involves a ramp in which the floor rises by approximately a metre. These are not casual transit areas though; the extensible bridges lack handrails and so the droids and/or crew who service these areas are expected to use caution.
These hanging cylinders tipped with cross-shaped modules are ubiquitous in the air shafts. Their function is unknown at this stage.
Air shafts are ubiquitous aboard Death Stars, even in high-security regions like the Emperor's private tower.
The blueprints for Death Star I indicate huge "void spaces" throughout the station's interior. This picture is difficult to reconcile with our views of the exposed innards of the Death Star II in Return of the Jedi. Assuming that the second battle station was designed and constructed according to the same principles as the first, there are no void spaces bigger than a kilometre, not counting the irregular gaps where the second station was left incomplete. Rather, a planar honeycomb structure, with axisymmetric circular plates seems to have filled most of the interior, apart from the axial column, main reactor and reactor shafts. The planar honeycomb dominates at least the majority of the station's volume, but the void spaces and immense fuel storage tanks might still exist as thin sections, not encircling the whole circumference of the globe.
Blueprints showing the huge void spaces.
To a distant viewer the surfaces of the Death Stars had a regularly mottled appearance. The broad dark semgents seen in both hemispheres were the city sprawls, divided by surface trenches. The dark and matt characteristics of these regions are characteristic of the roughness of the surface there: a higher density of towers and surface weapons emplacements. For the convenience of the crews stationed in the city sprawls, local artificial gravity was maintained in a core-directed sense, like the natural gravitation of a planetary surface.
The surfaces of the two operational Death Stars were criss-crossed with a network of regular linear trenches, most of which were only a few dozen metres wide and dozens of kilometres long. At the Battle of Yavin, rebel starfighters exploited the shelter provided by one such trench for cover from turbolaser fire during attack runs on a certain thermal exhaust port.
The polar meridional trench which gave shelter to rebel starfighters at the Battle of Yavin.
One of the most distinctive features of the operational Death Stars was the immense equatorial "waistband" trench. This was a vast structure in comparison to the minor trenches which criss-cross the ordinary hemispheric terrain; the equatorial trench was clearly visible in distant full-disk views of the battle stations. In fact the equatorial trench contained a nested heirarchy of trenches within trenches. The largest and most important docking bays were situated within these. For the convenience of incoming starships the arificial gravity in the waistband region was directed parallel to the Death Star surface, towards the north pole. The areas surrounding the equatorial trenches were smooth and heavily-armoured, with few habitable structures near the surface, but the most sheltered regions within the sub-trenches boasted an assortment of towers and turbolaser turrets. The equatorial trench of Death Star II was about 5.3km wide.
A star destroyer casts its shadow near what may be Death Star II's waistband trench. [ROTJ Sketchbook]
Naval crew at work near a window overlooking a docking bay region.
Stormtroopers look on as a freighter is drawn into a docking bay.
A frieghter passes through a docking bay shield.
Death Star II equatorial docking bays.
TIEs fly past the docking bays in formation during Emperor Palpatine's arrival.
Palpatine's shuttle viewed against the background of the containment field and space beyond.
Thousands of troops and crewmen assemble in a large docking bay for their Emperor's reception.
A shuttle flees an exploding docking bay.
Death Star I docking bay, according to a SWCCG card.
The thrust nozzles of the sublight drives were supposedly located somewhere in the equatorial region. Unfortunately they are unidentifiable in the films. This is unsurprising because the films concentrated on the habitable regions of the battle stations, and the thrust-nozzles' possibly-radioactive emissions would require these structures to be carefully isolated. However their invisibility in full-disk views of the Death Stars indicates that the nozzles must have been less than a kilometre in width. It is unknown whether they were located within the equatorial trench or on either side of it, though it does seem possible that some of the lights seen within the waistband may be the ion-drive outlets.
The surfaces of the two operational Death Stars were defended by countless turbolaser and laser cannon emplacements of various power levels. Two known models exhibited fire rates of at least one blast per second. The distribution and character of Death Star I's emplacements was skewed towards a defense against capital ships because the designers had assumed that no starfighter attack could pose a serious threat to the battle station. Enemy starfighters were to be either ignored or swept away by the station's complement of TIE fighters.
The poverty of anti-starfighter defenses was corrected for Death Star II, with a substantial increase in the total density of guns and the proportion of lighter weapons with improved fire-control. Possibly the greatest concentration of turbolaser towers was in the vicinity of Emperor Palpatine's private observation tower, where the batteries were spaced only a few hundred metres apart. If the towers were spread over the entire station's surface at this density, and if the station was completed, then the total number of turbolaser towers would exceed a hundred million. Realistically, the region near Palpatine's tower must be more heavily defended than most, so the real total number is probably only a matter of millions rather than hundreds of millions.
In the new edition of A New Hope, rebel starfighters flying above the surface are seen to come under fire when they are at such a height that the battle station horizon shows significant curvature. The turbolaser fire was quite accurate, nearly hitting the fighters despite the fact that it is a heavy weapon intended for larger and less nimble targets. This means that the effective range of anti-captial ship turbolasers is no less than a few dozen kilometres.
The surface of the battle station is dense with turbolaser towers in the vicinity of the Emperor's tower.
Design schematics for turbolaser tower, with X-Wing fighter to scale. The height of this tower is approximately 4.15 times the length of the X-Wing; about 52m tall.
Some shorter turbolaser towers defended the Death Star docking bay regions.
The precise nature of the Death Star prime weapon is undetermined. It certainly generates a great amount of possibly-monochromatic light, but the "superlaser" beams literally aren't lasers or light in any ordinary sense. (It is undoubtedly a high-powered version of the technology used in blasters and "laser cannons", and they aren't true lasers either.) The visible light is merely a by-product of the actual lethal emission, whatever the underlying physics of that energy may be. The Death Star's main weapon has also been named a "planetary proton beam generator" [The Technical Book of Science Fiction Films]. It is just as difficult to regard the emission literally as a proton beam as it is to imagine it being a laser. Lasers and proton beams are very different physical phenomena in any case. The true nature of the "superlaser" remains an undescribed piece of superphysics, and only its incidental effects have so far been named.
Careful observation of the firing process can yield indications about the underlying physical mechanism:
When the eight tributary beams meet at the weapon's focal point they do not pass through each other as genuine light beams would. Instead they come to a halt and energy apparently builds at that point until a critical moment when the final outbound beam is spontaneously released. Whatever force is involved in the "superlaser", it cannot be mere electromagnetism because non-disruptive superposition of beams is ruled out by the focal point behavior.
The direction of the composite beam is a simple vector sum of the directions of the eight tributaries. This suggests that no external force is in operation, and that the beam interactions conserve energy/momentum (neglecting wastage due to the lateral emission of green light). Thus the beams "feel" each other through an intrinsic interaction which is elastic.
The beam that struck Alderaan took less than a second to progate from the dish to the target. The range was about 75000km, which is about a quarter of a light-second. Thus the beam's speed is equal or approiximately equal to the speed of light.
During ignition the standing tributary beams exhibit bright pulsations which move at conspicuously subluminal speed. This does not contradict the fast propagation speed for the beam; the pulsations are slow-moving disturbances of the underlying beam. They are some kind of wave phenomenon, a collective behavior exhibited by whatever fundamental entities constitute the beam. The slow propagation of the pulses indicates involvement of something other than electromagnetic or gravitational waves, which travel at exactly lightspeed.
The initiator beams seen briefly in power shafts deep in each space station show characteristics which are absent or unobvious in the external beams. The visible puslations are at a smaller spacing: dozens of metres rather than the dozens of kilometers between pulses in the eight final large-scale external sub-beams. Perhaps there is a spectrum of pulsations, with the big ones being less common and therefore more widely spaced? There may be a dispersion relation, with disturbances of different wavelengths having different speeds. The superlaser beams in the shafts appear to be surrounded by a cylindrical set of rings. The role of these rings is mysterious, but they emerge after the beam first appears and before the first pulsations. They may be related to the force-field separating the beam from the air surrounding the nearby crewmen. The apparent size of the brilliant pulsations never seems to exceed the span of the rings.
The beams inside the shafts are less than a few metres thick, whereas the beams outside the station look as if they are at least a few hundred metres thick. The external beams could result from the union of clusters of many smaller beams which only exist in the Death Star's interior. Hundreds of metre-scale beams might give each beam of hundred-metre thickness. Alternatively, all of the superlaser beams might actually be microscopic, subatomic or even subnuclear in thickness. Variation in the apparent thickness would be due to differences of intensity and glare, and the behavior of the viewer's retina. A more powerful beam might be the same true thickness but dazzle the eye more effectively and thereby seem thicker.
The most basic consideration pointing towards some kind of superphysics is the magnitude of the device's energy output. The minimum necessary magitude of the blast that shattered Alderaan (calculated below) is roughly ten thousand times what would be released if the entire mass of the battle station's machinery was annihilated with an equivalent amount of antimatter. Yet the first Death Star was capable of generating a planet-destroying blast once per day. The power source must be much denser than ordinary matter or antimatter; probably involving compact forms of matter and energy like miniature black holes or neutronium. It may involve superphysics of an even more exotic kind. The mass of the empty station must be substantially less than that of its compact energy sources. The Death Star's power systems and prime weapon clearly rely on superphysics and superengineering far beyond simple fission, fusion or matter-antimatter annihilation.
In the Galactic Empire mundane technologies handle bizarre phenomena such as hyperspace, which are so far ourside present physical capabilities that we can only gauge their consequences and basic properties without hoping to guess the underlying details. The superlaser is an unusally large technological application. It therefore seems reasonable that Death Star design engineers understand energy fields and condensed forms of matter which are far beyond those which are encountered in the course of ordinary living. Questions of "how" the superlaser functions may be unanswerable, but we can determine useful limits on the capabilities of the technology.
The above considerations and observations lead to the following conclusions. The superlaser has a power source that is denser than ordinary matter or antimatter, or else it has a physical basis or energy source which is beyond mass-annihilation energy. The visible light of the superlaser is probably only a minor byproduct, and isn't actually the fundamental constituent of the beam. Beams propagate in straight lines like coherent light, at least under some circumstances and on distance scales of metres up to tens of kilometres. It propagates at lightspeed, or nearly so. On the other hand the physical forces underlying the superlaser have some seriously non-linear aspects. It does not obey superposition rules and can become unstable to the emergence of subordinate wave phenomena. The beams can spontaneously confine or enhance each other depending on the energy density or some other parameters.
A superlaser tributary beam shaft, as seen from a control station. Ignition commences and the beam becomes visible; rings appear and intensify; brilliant pulses surge along the beam. Sometimes two consecutive pulses simultaneously in view.
The "superlaser" shots fired from both of the Death Stars emerged from eight or nine initial beams which met at a common focus without passing through each other. The beams interact; they do not superimpose in a simple way.
According to the STAR WARS Technical Journal of the Imperial Forces the effective range of the superlaser weapon is 47,060,000km (about 157 light-seconds). [This distance is slightly less than one third of the average distance between Earth and its Sun.] This is the only reference to make an explicit statement about the range of the weapon, and there is little reason to disbelieve this particular number. In principle the effective range should only be limited by the ability to aim the beam and its eventual attenuation due to the lateral light emissions. (The attenuation range may be an interstellar distance.)
When the Death Star I fired on the planet Alderaan it was within "antigrav range", which is approximately six planetary diameters. This corresponds to a distance of at least 75,000km. Therefore we know that the maximum range of the weapon was something larger than this distance. We do not know whether it was necessary for the Death Star I to go this close to the target, but this range is sufficient. It remains possible that the planet could have been demolished from a much greater range and that the time and place of firing were merely chosen at the whim of Grand Moff Tarkin. The case may simply be that the governor chose that close distance so that he could enjoy a good view of the artificial cataclysm.
By similar reasoning, the battle station's attempt to fire on the fourth moon of Yavin establishes an independent lower limit on the weapon's range. Judging by the scale of the gas-giant planet stated in Galaxy Guide 2, and the configuration of celestial bodies shown on the tactical display in the rebel control room, the Death Star was able to fire from a distance of on the order of one or two hundred thousand kilometres.
The accomplishment of the complete disruption of an Earth-like planet sets a lower limit to the destructive capability of the Death Stars' prime weapon. The gravitational binding energy of a planetary body is the minimum amount of energy required to eject all of its material with sufficient force that it will not fall back together. (It is also the total energy which would be released as heat if the entire substance of the planet were gathered together from free space.) For an object of a given mass the gravitational binding energy is increased when a greater fraction of the mass is concentrated near the centre. The density of a planet tends to increase with depth from the surface, because the weight of overlying material causes pressure to increase with depth, and heavier materials tend to sink towards the core when a planet forms.
Alderaan is probably a typical habitable planet, with much the same dimensions and composition as our Earth. An approximation for its gravitational binding energy can be obtained according to the density structure profiles of the Earth or Venus. An approximate figure for the binding energy of Alderaan, assuming Earthlike composition and mass of 5.9 x 1024 kg, is:
U = 2.4 x 1032 joules.
It should be noted that this is simply the minimum energy required to destroy a terrestrial planet. The Death Star's maximum capability is much greater.
The duration of the superlaser strike on Alderaan was about 0.21s (although it took slightly more than a second for the weapon to build up energy before the beam was released). Therefore the power of this beam, which needs to exceed the power dissipation rate of any deflector shields of the target, is at least of the order of 1032 W.
In A New Hope the original Death Star was able to generate at least this amount of energy and to replenish it within the few days which transpired between the destruction of Alderaan and the Battle of Yavin. According to The Death Star Technical Companion, the Death Star was capable of generating sufficient energy for a full planetary disruption in a single day. Thus the main reactor was capable of generating energy beyond the station's continual running needs at a base rate of at least 2x1027 Watts.
This power is approximately five times the continuous output of the Sun. It is vastly in excess of any artificial power source known to any other major fictional universe.
It should be remembered that this is only a minimum for the power of the Death Star superlaser and the output of the main reactor. This is the quantity of energy which is required to blast the material of a terrestrial planet into space at approximately the escape velocity, which at the surface is about a dozen kilometres per second. Thus any explosion merely at the threshold energy would take hours to unfold. The explosion of Alderaan took less than a second to occur, implying characteristic speeds of at least thousands of kilometres per second. The actual energy delivered by the superlaser therefore must be very much greater than the calculated minimum.
By performing frame-by-frame timing measurements on the expanding cloud of debris, (assuming a movie frame rate of 24/s) the velocities of indentifiable parts of the explosion can be determined. The outermost parts of the cloud are expanding at a characteristic speed of 1.8x10⁷ m/s. This is about 6% of the speed of light and 1600 times escape velocity. Since these are the fastest-moving pieces of ejecta, they can be used to determine an absolute upper limit on the total energy of the blast. This destructive energy of Alderaan's superlaser beam was less than 2.6 million times the threshold; in other words: 3.4x1038 J. The actual total energy was some fraction of this upper limit, depending on how the blast energy was distributed amongst the particles.
This energy corresponds to the annihilation of 3.8x10²¹ kg of mass. It is not yet established whether all power technologies in STAR WARS are based on annihilation technologies (such as nuclear fission, fusion or antimatter annihilation) but it has been suggested that the energy requirements of the Alderaan blast could be lowered if the substance of the planet was in some way contributing to the explosion. However it is hard to argue that it could make much difference in practice and in detail. If the energy source was antimatter annihilation then half of the blast energy could have come from matter in the planet, but in this case the Death Star still needs remarkable power in order to create an equivalent amount of antimatter. If we suppose that the blast involved a runaway thermonuclear reaction (neglecting concerns about the required densities and temperatures of reactants) then Alderaan does not contain enough nuclear fuel. If it were entirely made of hydrogen gas (which is grossly unrealistic for a terrestrial planet) then the necessary quantity of reactant would be comparable to the planetary mass. However for a realistic planet made of iron and silicates, which are much less efficient nuclear fuels, the theoretically required reactant mass would be orders of magnitude greater than the total mass of Alderaan. Even if that weren't the case, it can be argued that the violence and rapidity of the observed explosion means that reactions could only take place within the thin cylindrical volume of planetary material in the path of the "superlaser" beam. Even if there were some way to rationalise or reduce the energy requirements of the Alderaan blast by appealing to reactions of some kind, the Death Star's shields were able to withstand a comparable amount of energy as the station stood within the blast region unharmed. The conclusion that the Death Star possessed power systems on the 1038 J scale seems inescapable.
Measurement of the apparent expansion of the Alderaan debris cloud provides further constraints on the properties of the Death Star's blast. The main debris cloud grows in a way that is slightly elongated in the direction of the incident beam. At late stages, the debris is clearly not concentric with the initial position of the planet. This suggests momentum transfer to a large part of the planetary bulk. Judging by the offset of the centre of mass before the beam strike and several seconds into the explosion, the mean recoil velocity of the ex-Alderaanian matter is on the order of 6.7 x 10⁶ m / s in the plane of the picture, implying an impulse of 4.0 x 1031 kg m / s. A massless, light-speed beam delivering this amount of momentum would have a total energy of 1.2 x 1039 J. However this is an underestimate by some trigonometric factor, since the beam clearly was not parallel to the plane of the picture. Even so, the momentum-based estimate is in good agreement with estimates based on the apparent velocities of the expanding debris. The difference of one to two orders of mangitude is justified by the inefficiency of converting incident beam energy into kinetic energy of debris; much of the input energy is deposited as heat in the absorbing material.
It is interesting to compare the energy of the Alderaan blast with the requirement for destroying a large gas-giant planet like Yavin. The magnitude of the Alderaan blast is a few tens of thousands of times what was needed to disrupt a terrestrial planet. Coincidentally, the gravitational binding energy of Yavin turns out to be roughly ten thousand times that of Alderaan (I assume the properties described in Galaxy Guide 2: mass 323.7 times standard (1 = mass of typical habitable planet); equatorial diameter of 192,478km; cloud-top surface gravity of 2.74 times galactic standard.) The Death Star therefore could have demolished it. However the destruction is near the threshold and the explosion would have been very slow. The planet would have taken many hours to blow apart completely. This awesome spectacle would probably have been a nuisance to the movement of the battle station, even if it was able to recharge soon enough to destroy the fourth moon before the rebels evacuated. Perhaps these considerations, in addition to Tarkin's pride and complacency, were influential in persuading the Death Star commanders to approach the rebel base by orbiting rather than obliterating the planet.
The Death Star begins its ill-fated orbit of Yavin.
The Overbridge's main viewscreen diplays Yavin and the orbits of four moons. Yavin IV is at its orbit's near-planet point. Other moons are being removed from the display.
Firing tactical display screen with countdown clock at different points in the battle station's orbit.
The "eye" of each functional Death Star was a parabolic bowl. During the first moments of firing, several bright green beams would appear between evenly spaced points on the rim of the "eye" and converge at the parabolic focus. A fraction of a second later a thicker or brighter beam would appear, striking outwards from the focal point towards the target. In the case of the original Death Star the outgoing beam emenated directly from the focal point, not from the centre of the dish. When the Death Star II fired, the beam emerged from the dark point at the centre of the bowl, and passed through the focal point and continued outwards colinearly.
This visible difference in firing mechanism may reflect an improvement in weapon's performance over the initial design on the first battle station. Death Star II fired with much greater accuracy; it could strike at targets as small and mobile as capital starships, a much more impressive feat than hitting stationary celestial bodies. It was also able to fire small bursts at least once every few minutes, as well as sparing enough energy to fulfill the Emperor's extreme contingency plan for the destruction of the Endor moon. The original Death Star took about a day to recharge.
The firing pattern seen at the Battle of Endor may have enabled the gunners to vary the position of the focal point further away from the true geometric focus. The Death Star II was easily be able to adjust its beam direction for every particular shot, allowing it greater firing precision and the ability to hit any target within a broad fire arc. Death Star II was known to fire in directions which are clearly far away from the principal axis of the dish. The point where the initial beams meet still seems to be in the geometric focal plane of the parabola, but not necessarily the central focal point. If the fire arc of the second battle station is less restrictive than its smaller older sibling then it is tempting to attribute the difference to the difference in firing sequence. Whether this arc really was less restrictive than that of the earlier station is not yet determined.
We have less evidence regarding the ability of Death Star I to shoot off-centre targets, but indirect evidence suggests that it might be comparable to the reach of its younger sibling. The tactical displays of the Rebel Alliance control room at Yavin IV showed a significant wedge-like region to the front of the battle station, which appears to represent a firing arc of about forty-five degrees.
The shot fired at Alderaan had several interesting details. Firstly, the eight component beams do not emerge from the surface of the dish at the same time. A radial area between the centre of the dish surface and the origin of each component beam is illuminated in the same colour as the beam itself. This may be merely reflected light, or it may an excitation which is in its own right integral to the generation of the final main beam. At first only the first four component beams fired, i.e. every second beam. Furthermore these beams were not exactly simulatenous in their appearance. The intermediate beams, appearing later, weren't simultaneous either. The eight beams all met at the focal point of the parabolic dish, but nothing proceeded immediately out of this point. The main superlaser beam emerged from the convergent point only after a perceptible wait of a large fraction of a second. Both the constituent beams and the emergent beam exhibited nonstatic behavior and varying thickness: the light intensity rose and fell as quasi-periodic pulses traveled along the beam's length. The advancing front of the main beam appears bulb-like with an enhanced intensity.
The dish sits inert as the firing mechanism ignites within the station. The first beams strike out and meet at the focal point, and stop or turn back along their own paths without passing through each other. A fraction of a second later there are six beams at the focal point. When eight tributary beams have joined, the composite beam strikes out at the planet. The visible front of the beam has a bright pulse head.
Firing sequence for the new Death Star is similar to that of the old model, except that it involves less time in primary ignition, and a ninth beam is shot through the focus from the centre of the dish.
A sequence of frames from a later firing of the Death Star II. The close-up picture of the dish seems to have been flipped vertically and it does not correspond to the lighting on the station shown in the long-range view. [The inconsistent close-up is probably placeholder footage that should have been replaced.]
The rebel tactical display indicates the Death Star's fire arc.
The dish of the second Death Star fires, reaching out to a rebel ship.
Death Star II strikes well off-centre, obliterating a rebel star cruiser which explodes from the inside outwards.
The privately-constructed superlaser weapon Darksaber featured a simplified firing system and enhanced power generation. Instead of forming the main beam from eight seperate component beams in a focus dish, a single superlaser was emitted along the central axis of the cylindrical vessel. Although this contributed to improvements in the efficiency and power of each shot, there must have been a dramatic reduction in the effective targetting ability. The Darksaber could only fire in the direction of its heading; without the versatility of the component beams it could not have a fire arc as wide as either of the two operational military Death Stars.
Given the great difference between the absolute sizes of the first and second Death Stars, it is significant that the primary weapon occupies approximately the same proportion of both globes. This configuration must be optimal, for one or more reasons. Somehow the effectiveness or the feasibility of a "superlaser" dish must vary in direct proportion to the size of the station where it is mounted.
The larger battle station probably provides greater reactor power, and probably greater firepower as a consequence. It may be that the weapon needs to be a proportionally greater volume in order to exploit the greater power available.
Perhaps the angular span of the dish is of critical importance? The splitting and recombination of tributary beams (either outside at the focus or inside the weapon's mechanism) is a process that may depend on the angles of intersection. If so then the tributary beam shafts will have to be spread over a specific range of latitude and longitude, and the dish will have to cover the same proportion of each Death Star surface.
Perhaps the Death Star type of beam weapon, which is formed from the combination/interference of triutary beams, is analogous to an interferometer, where the linked action of identical devices, separated by long base-lines, yields some advantage in terms of angular precision (angular resolution of imaging in the case of a telescope; possibly analogous to aiming precision in a beam weapon). In that case, a wide dish would provide the finest aim.
However the advantages of a wide angular spread may be counterbalanced by the increasing disadvantages of structural weakness when the crater is deep compared to the global volume. The station would be most sturdy with a smaller dish, but a smaller dish may be underpowered or imprecise. The balance of these opposing requirements must determine the optimal dish size relative to the globe.
Particle deflector shields protect a vessel from impacts by high-speed projectiles. The precise mechanisms accomplishing this are presently unknown, but the shields resist or deflect the motion of high-speed particles much more effectively than slow-moving masses. For instance a space station may maintain its protection whilst slow-moving freighter craft are free to approach and dock and enemy fighters fly through with little impedence. This velocity-dependent behaviour of deflectors seems similar to the action of a magnetic field on charged particles, which explains why some spacers to colloquially refer to deflectors as "magnetic shields". The existence of any real connection between deflectors and genuine magnetic phenomena is doubtful, because deflectors have the distinction of acting on uncharged objects. The most powerful deflectors, such as the security shield at Endor or the defense shields of major civilised planets, are able to block the passage of objects moving at almost any appreciable speed. This has disasterous results for any craft which unwittingly collides with the field. Starfighters entering the deflectors of a Death Star might experience slight resistence whereas high-velocity missiles would be seriously perturbed.
Deflectors are not effective against indefinitely violent impacts. The energy absorbed by the field when the projectile is deccelerated must be dissipated by the shield generator sustaining it. These generators have limits to their maximum rate of power dissipation and total absorptive capacity for any one impact. The quality rating of a shield system determines its effectiveness and the magnitude of this shield failure point. The Death Stars possessed deflector shields of immense power by comparison to those of capital starships, though much weaker than many ground-based deflector systems. The huge power demands of the superlaser and other key functions of the Death Stars prevented the implementation of comparably impressive deflectors.
The particle deflector shields of the first Death Star were easily able to withstand the impact of the debris from the explosion of Alderaan. According to the A New Hope novel the Death Star was at a distance of approximately six planetary diameters when the explosion took place, which is approximately 75000km. As discussed above, the amount of energy deliverd to the planet was very much greater than its gravitational binding energy. Consequently most of the injected energy would have come out again in the form of kinetic energy of the debris. Assuming that the explosion was even in all directions, the fraction of this energy incident on the Death Star is the ratio of the battle station's crossectional area to the surface area of the 75000km-radius sphere. If the Death Star was only 120km in diameter the fraction is about 1.6 x 10⁻⁷. Thus the absorptive capacity of the particle deflector shields is comfortably greater than a number which is itself very much in excess of:
S > (I-U)/U 1026 Joules
where I is the amount of energy injected by the superlaser, U is the magnitude of the gravitational binding energy of Alderaan. The actual value of I is probably greater than U by a factor of tens of thousands.
Holographic schematic showing the circulations of the security deflector shield projected from the sanctuary moon. Note that it only encloses a small geographical region of the moon, which is nonetheless wider than the prominent dish seen on the ground later in the movie.
Atmosphere containment shields.
The apertures of deep-space docking bays, such as those of the Death Stars, are sealed against the vacuum by a specialised adaption of deflector technology. A weak deflector field produced by a ring generator around the opening is tuned to cause back-scattering of impacts with velocities and energies typical of the gas molecules of a warm and habitable atmosphere. In this way large objects are able to fly through the bay entrance whilst most of the air is retained inside.
The shields are obviously too weak to appreciably affect the passage of a starship. In A New Hope and Return of the Jedi we witness the Millennium Falcon and several shuttles pass through the atmosphere containment shields of docking bays. The rebel fugitives in the freighter met little resistence from the shield during their hasty takeoff several hours later.
It is possible that the passage of a ship temporarily undermines the integrity of the containment. In A New Hope the flight controllers cleared and evacuated the Millennium Falcon's docking bay before reeling it inside. When Lord Vader's shuttle arrived in Return of the Jeci its bay was clear of personnel until after landing. (The stormtroopers paraded in after landing but before the Dark Lord disembarked. We don't know whether the Emperor's arrival proceeded similarly because we never saw the actual moment of touchdown.) The clearance procedure may be a routine precaution to avoid danger to people within the docking bay.
On the other hand the clearance might simply be intended to allow the starship pilot to land without fear of squashing or irradiating any stray people. In this case the we don't need to postulate any loss of atmospheric containment integrity during the passage of large objects.
Lighting around the aperture of a hangar indicates but does not seem to be necessary for the operation of the atmospheric containment field. Although all of the Death Star hangars seen to date have a complete illuminated ring, at least two of the hangars of Lord Vader's Executor warship have light rings which are interrupted at some points. (See Executor for more information.) The lighting most probably is a warning to humans and droids that they should not walk near or beyond that point of the deck.
Glowing warning lights make the boundary of the containment shield generator clearly visible around docking bay mouth.
A frieghter passes through the docking bay atmospheric containment shield.
Sometimes termed "ray shielding", these devices have an absorptive effect on radiation and beam attacks of a massless or nearly-massless nature.
Energy shields are used to dampen the potential damage of blaster hits.
As with particle deflector shields, energy shield generators have maximum dissipative power ratings.
The energy shields of the vulnerable exhaust port on Death Star I prevented rebel starfighters from making simple laser cannon attacks.
The quality of energy shields are combined with the quality of deflector shields to give the overall shield rating which is used in roleplaying game statistics.
Magnetosphere?
When rebel starfighters were still at least several thousand kilometres from the Death Star at Yavin, they felt some slight jostling as they passed through "the magnetic shield". This may be a powerful, long-range, global manetosphere deliberately generated to protect the surface of the station from ambient cosmic rays or energetic solar-wind particles. It would function like the van Allen belts of a planet. In fact the station's proximity to Yavin would make such a device desirable; great jovian planets accumulate lethal radiation levels in their natural magnetospheres. The ordinary combat ray-shielding probably operates on completely different physical principles, probably has shorter range and is more location-specific.
For further details on the treatment of continuity, refer to Continuity, Canon and Apocrypha.
References:
This page was constructed and is maintained by
Curtis Saxton.
This page is neither affiliated with nor endorsed by Lucasfilm Ltd.
This site is kindly hosted by TheForce.net.
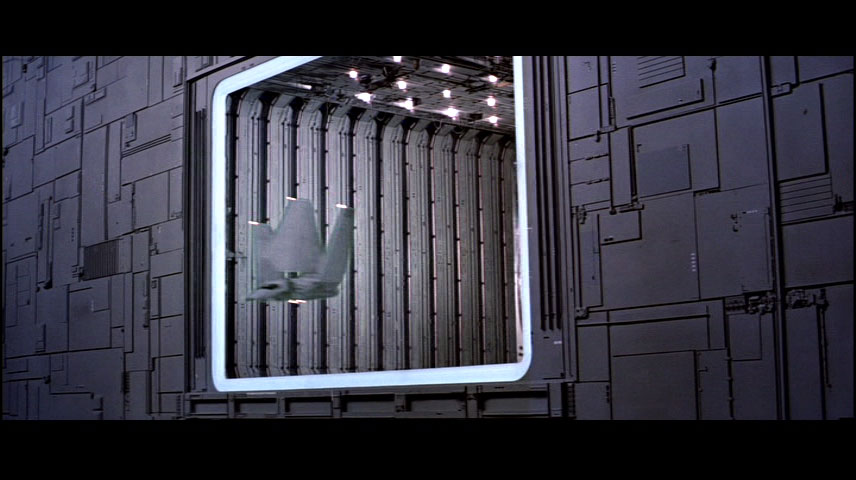
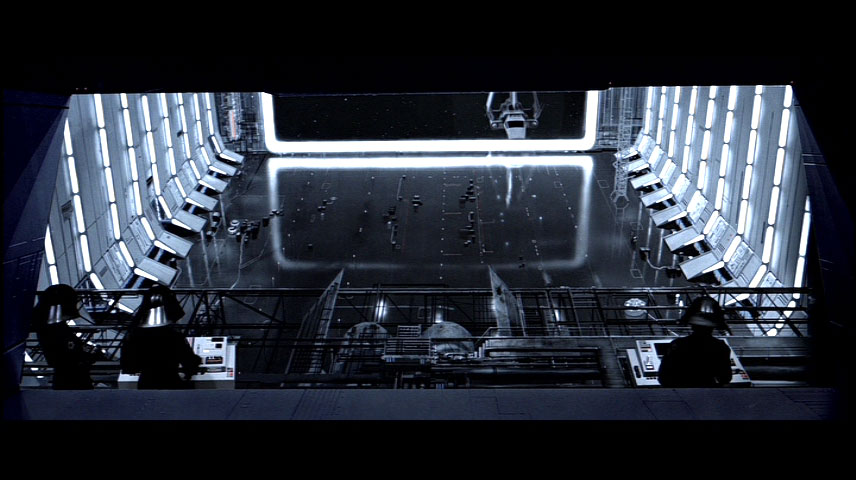
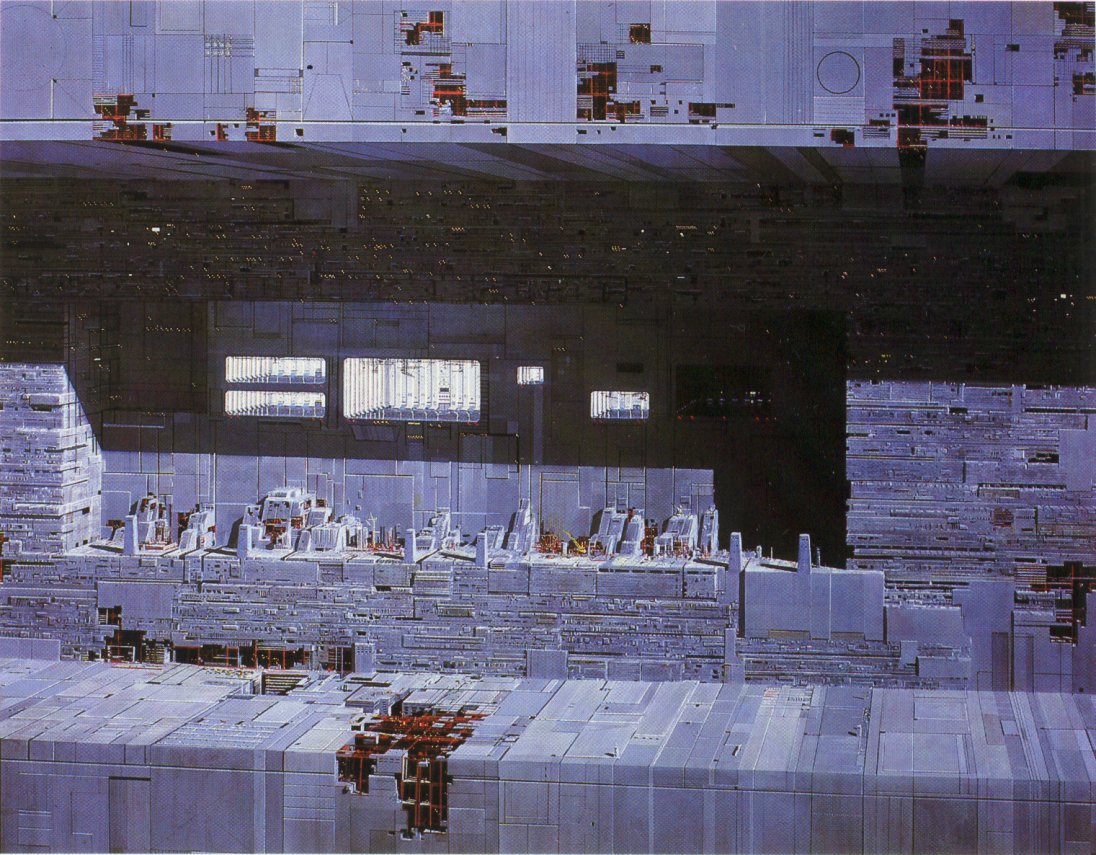
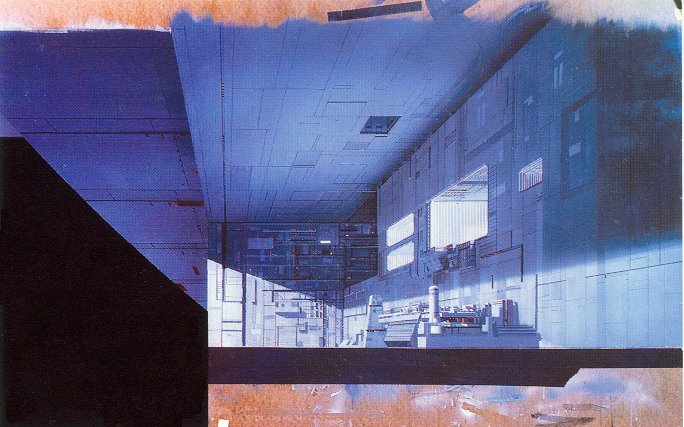
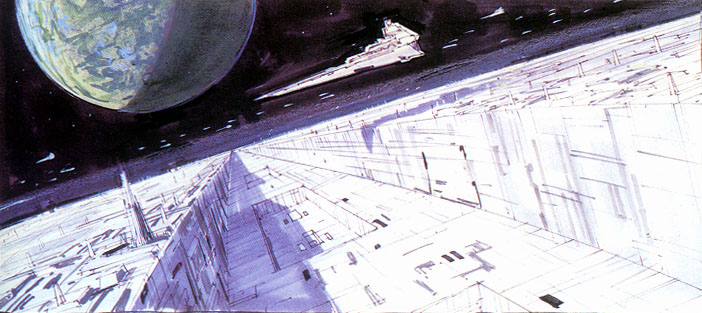
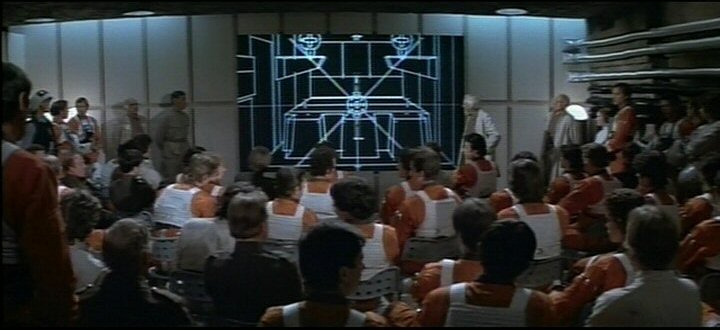